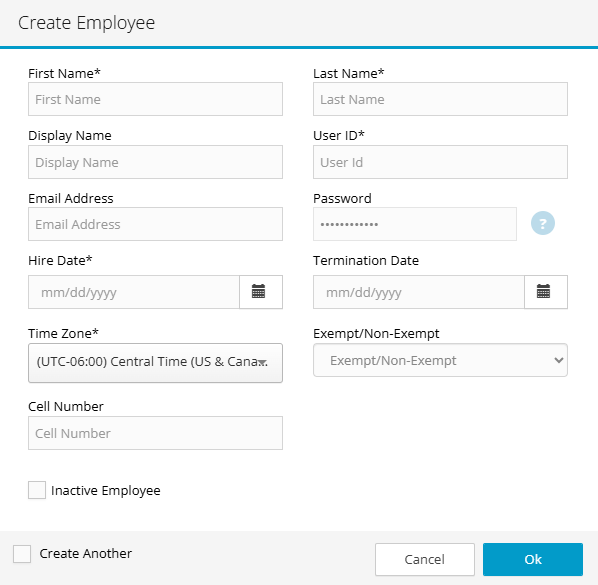
Step 1: Add Users (Employees & Consultants)
- Navigate to the Employee menu
- Click on Employee List
- Click the New Employee Button
- Complete the fields below
- Select the Ok button and repeat steps 1-4 for each employee
___________________________
Step 3. Assign User Roles
Once your Hour Timesheet site is set up, you’ll need to define system roles for your users to control access and permissions across the platform.
By default, all new users are assigned the Employee role. The person who creates the site is automatically assigned the Administrator role, granting full system access and configuration privileges.
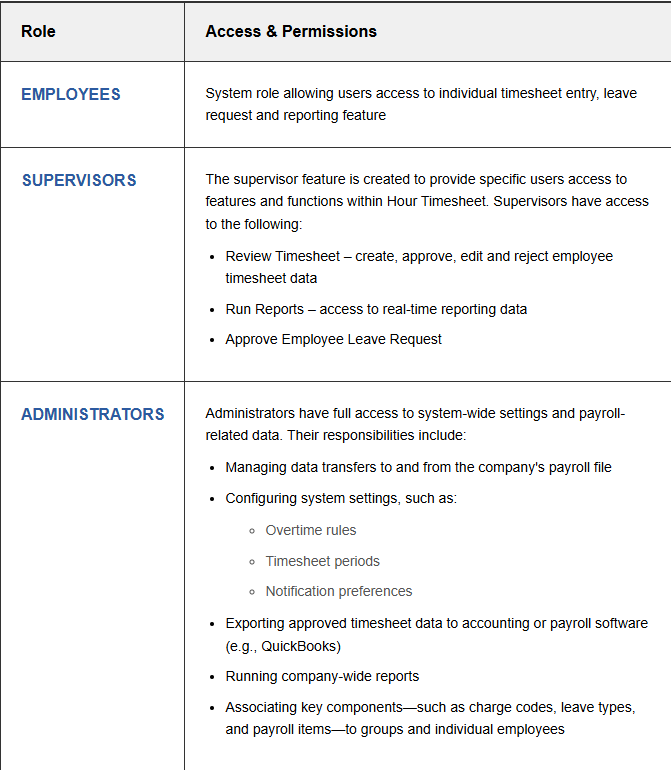
Setting User Roles
- Navigate to the Employee List menu
- Identify the users from the list that are Supervisors, Accountants or Admins and click the Assign Roles link.
___________________________
Step 4. Create Groups
Hour Timesheet allows you to organize employees into Groups, which can help structure your workforce for better visibility and management. This feature is optional but useful for companies with multiple departments, teams, or project-based roles. Please note:
- Employees can belong to one or multiple groups depending on your setup.
- Once groups are created and employees are assigned, you’ll be able to view certain features—such as reports or time entries—by group rather than across the entire company.
This makes it easier to track activity, manage approvals, and analyze data at a more granular level.
- Navigate to Group menu
- Click New Group or Edit Group link
- Enter group detail
- Enter group supervisor – see Note 1 below
- Click employee(s) to be associated to group
- Click the > icon
- Click the Save button to complete
___________________________
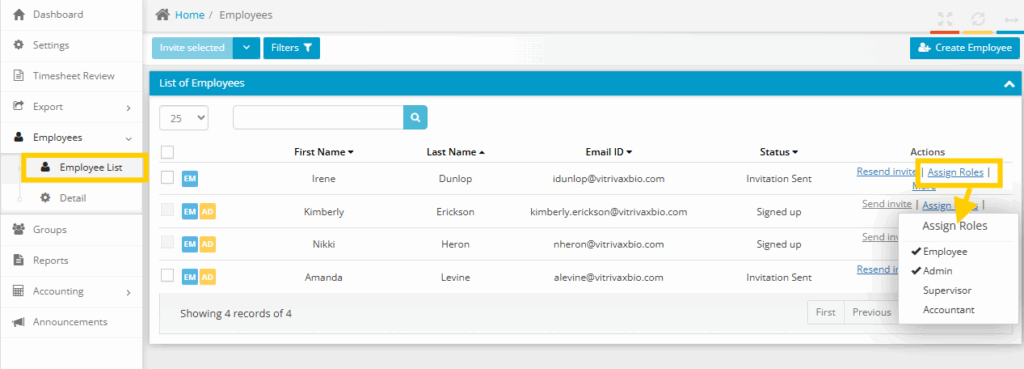
Step 5a. Create Charge Codes
Charge codes are the items that employees will be charging time against when completing a timesheet.

Follow the steps below to create Charge Codes
Navigate to the Accounting/Codes/Manage Codes Page
- Click the label you are wanting to add codes to (example…we will be adding job codes)
- Under Manage Job Code (right side) click the Create New Job Code (this will be the list of labels created above)
- Enter Job Code data and hit Save
- As you add new Job Codes, you will see the list populate in the middle box on the page
- Repeat steps 1-4 above for each of your timesheet labels that you will be tracking time against on the timesheet.
___________________________
Step 5b. Adding Pay Types (Optional)
Pay Types are separated into 3 different categories. The pay type categories are:
Regular (examples: Hourly, Salary, G&A, Overhead, B&P, etc.
Overtime (examples: 1.5 OT, Double OT)
Leave Related (examples: Sick, PTO, Vacation, Holiday, Bereavement, Military)
- Navigate to the Accounting/Codes/Manage Pay Type tab
- Select the Regular Pay Type under the Pay Type Heading. Click the Create Regular Pay Type button for each of the regular pay type needed on the employee timesheet
- Select the Overtime Pay Type under the Pay Type Heading. Click the Create Overtime Pay Type button for each of the overtime pay type needed on the employee timesheet
- Select the Leave Type Pay Type under the Pay Type Heading. Click the Create Leave Related Pay Type button for each of the leave pay type needed on the employee timesheet
The box in the middle of the screen will display created pay types once they are added to the software.
___________________________
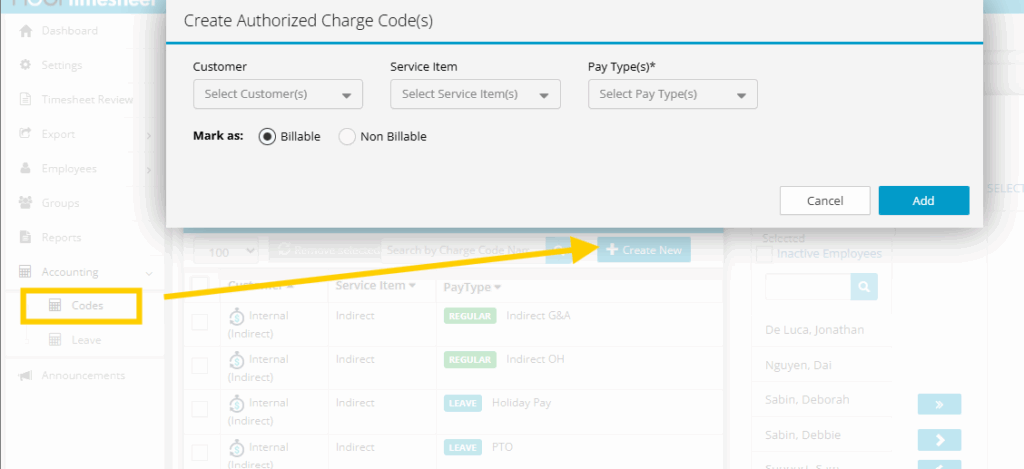
Step 5c. Mapping Job Code Data
- Navigate to the Accounting/Codes menu
- Click the Create New button
- Select the Customer/Job to expand the list of Select Charge Codes. Select from the list the Customer/Job(s) needed for association to employee(s) REQUIRED
- Select the Service Item to expand the list of Select Service Items. Select from the list the Service Items needed for association to employee(s) OPTIONAL
- Select the Class list to expand the list of Select Classes. Select from the list the Classes needed for association to employee(s) OPTIONAL
- Select the Pay Type to expand the list of Select Pay Type(s). Select from the list the Pay Types needed for association to employee(s) OPTIONAL
- Click the Add button
___________________________
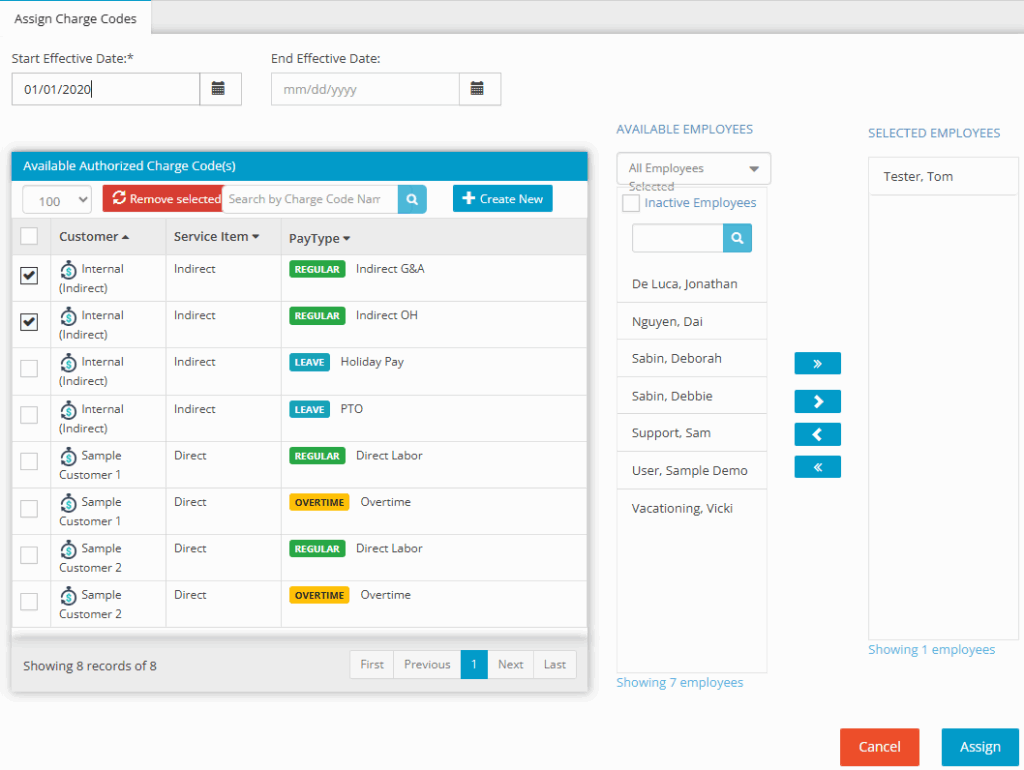
Step 6. Assign Employee Charge Codes
Creating charge code associations for each employee will limit what the user is able to charge to when entering hours on a timesheet. Employees can have multiple charge code associations and charge codes can be assigned to multiple employees. To create charge code associations, follow the steps below:
- Navigate to the Accounting/Codes menu
- Place a check in the Available Authorized Charge Code(s) – created in previous setup process.
- Select from the Available Employees list the appropriate employees to be associated to the Available Authorized Charge Code(s) from above.
- Click the > to move the selected employees from #8 above to the selected employee list box
- Click the calendar icon box to select a Start Effective Date and End Effective Date (optional)
- Click the Assign button to complete.
NOTE If no charge code associations are created, employees will have access to all codes.
___________________________
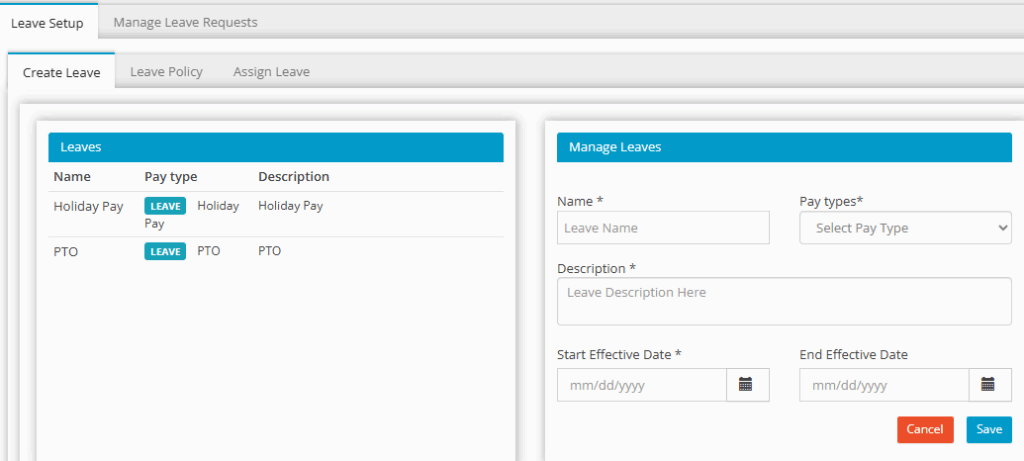
Step 7. Create Leave Types
Leave Types created in Hour Timesheet are associated with leave payroll items previously created in your accounting software. To create a leave type in Hour Timesheet:
- Login to Hour Timesheet as Admin or Accountant
- Navigate to Accounting→ Leave sub menu
- Click Create New Leave
- Enter Leave Name
- Select Pay Type from drop down box (this should be the list of leave pay types imported from QuickBooks)
- Enter Leave Description
- Enter Start Effective Date of new leave type
- Click the Save button to complete.
- Repeat steps 1-6 above for each leave type.
___________________________
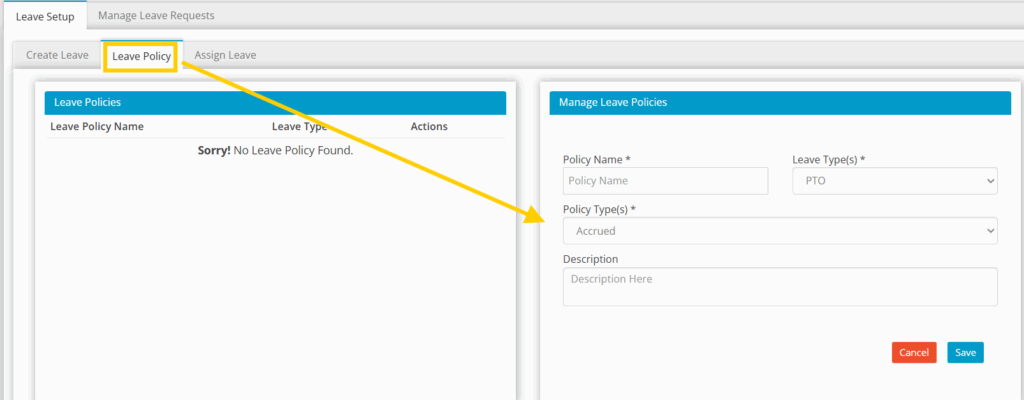
Step 8. Create Leave Policies
Types of Leave Managed by Hour Timesheet are: Accrued Leave, Earned Leave and Comp Time
Creating Leave Polices
- Login to Hour Timesheet as Admin or Accountant.
- Navigate to Accounting→ Leave sub menu.
- Click the Leave Policy tab (Optional)
- Click Create New Leave Policy.
- Enter Policy Name. (Sample: Standard FT Sick Leave Policy)
- Select Leave Type from the Select Leave Type drop down box. (Sample: Sick Leave)
- Enter the Policy Type
- Accrued leave uses the hire date stored in the employee’s profile
- Earned leave uses the number of hours worked on a timesheet to calculate leave
- Enter Leave Description. (Sample: Standard Sick Leave Policy for Full Time Employees)
- Click the Save button to complete.
- Repeat steps 1-8 above for each leave type.
Configuring Leave Policy Rules
- Click the Leave Policy tab
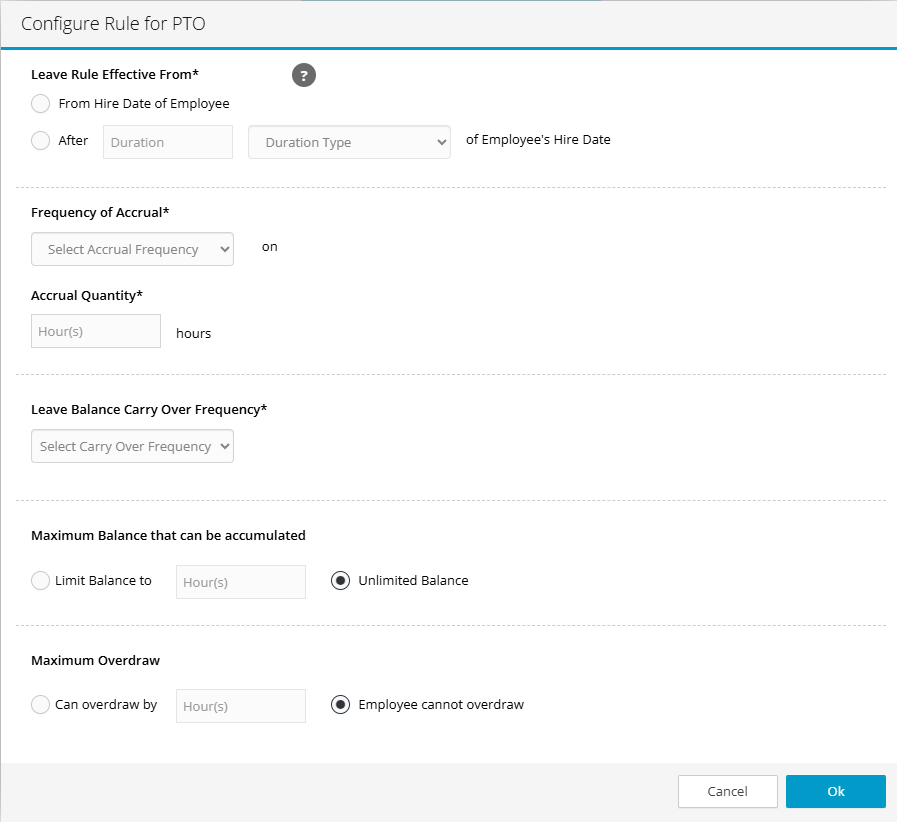
- Click the +Configure Rule text next to the leave to be configured. Complete the following:
- Leave Rule Effective From – Click the radio button for one of the two options below for this setting.
- From Hire Date of Employee – Runs the accrual from each employee’s hire date.
- After [user defined] Duration from employees hire date – Accrual for each employee will not begin until duration time is complete.
- Frequency of Accrual – this field is to define the period of time in which an accrual will run. Examples (weekly, bi-weekly, semi-monthly, monthly, annually)
- Accrual Quantity – this field is used to define the rate at which the leave will be earned for each of the frequencies identified above.
- Leave Balance Carry Over Frequency – if leave balance carries over from one period to another, the user will be able to define the date on which the carryover occurs.
- Max Balance – this feature allows the user to set the maximum number of hours for each type of leave that an employee may carry on the books. Once this value is reached for each employee, the remaining hours will be accounted for as Lost hours.
- Max Overdraw – this feature allows the user to define the number of hours that an employee may go “into the negative” for each type of leave.
- Click Ok
- Repeat steps above for each leave policy.
Notes:
- Balance is reduced after timesheet is submitted at the end of each timesheet period.
- User may be allowed to “go into the negative” if feature is configured.
- System will stop accruing leave once limit “ceiling” is reached. Additional leave earned or accrued after leave ceiling is reached is moved to the “lost” column.
___________________________
Step 9. Assign Leave Type to Employee(s)
Users with the supervisor, admin or accounting roles may view individual leave balances for each employee. Employees will not be able to see leave types using the Add Leave Hours section on the timesheet until leave is assigned. Employees will not start accruing leave until leave has been assigned.
Creating Leave associations by employee is required so that the timesheet can select “Add Leave Hours” from the employee timesheet. To assign Leave Types to an Employee:
- Login to Hour Timesheet as Admin or Accountant
- Navigate to Accounting→ Leave sub menu
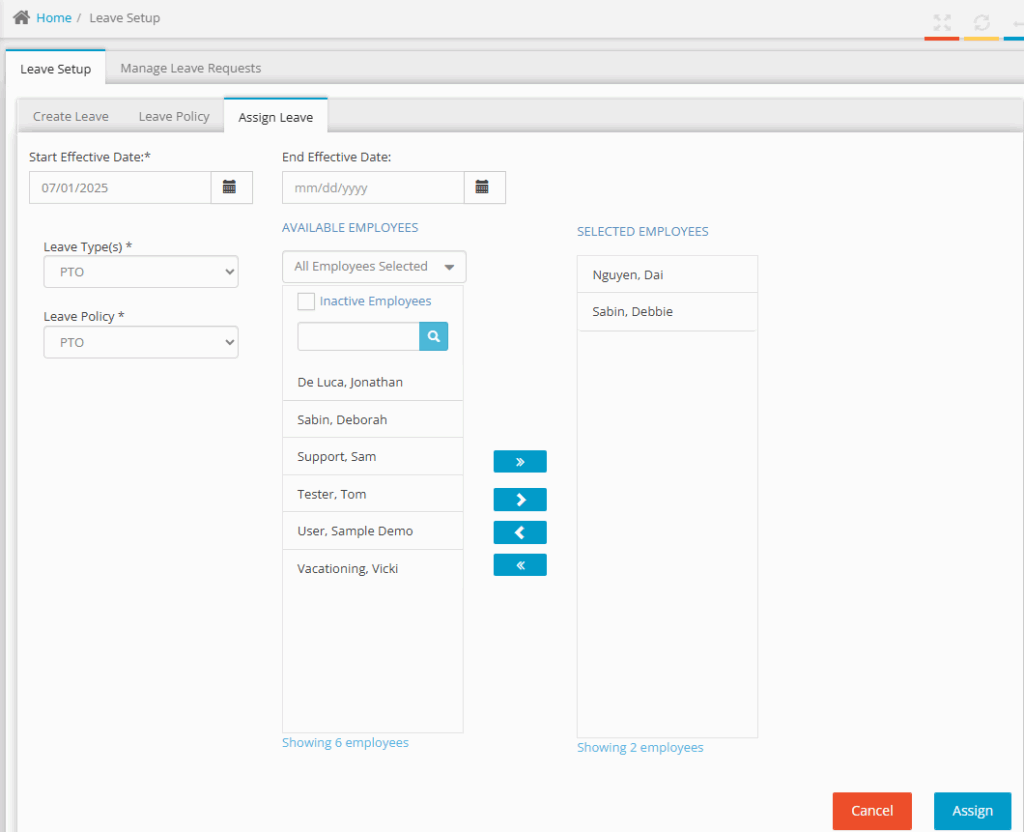
- Select Assign Leave tab.
- Click the calendar icon box to select a Start Effective Date and End Effective Date (optional)
- Select a Leave Type from Available Leaves selection box.
- Select a Leave Policy from Select Leave Policy selection box.
- Select from the Available Employees from Available Employees selection box.
- Click the > to move the Employee(s) to the Selected Employees list box.
- Click the Assign button to complete.
- Repeat steps 1-7 above for each leave type.
___________________________
Step 10. Create and Assign Overtime Rules
This feature allows the system admin to establish a business rule to set a threshold on the timesheet so that employees are forced to charge time to an “overtime” pay type once certain criteria is met (defined by the rule). Once configured; the employees will be notified upon timesheet entry that hours must be moved to a pay type associated with overtime.
These hours will be identified in RED on the timesheet to the employee
- Login to Hour Timesheet as Admin or Accountant
- Navigate to Settings/Overtime Rules tab
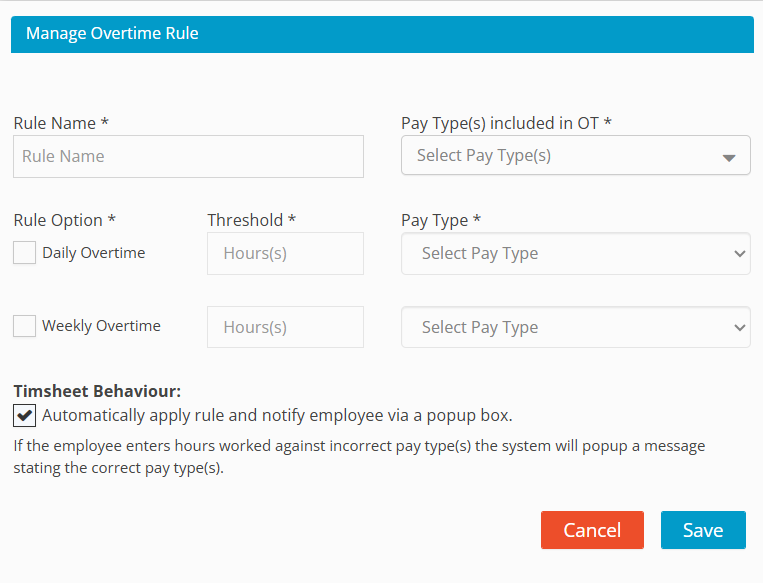
- Click Create New Overtime Rule
- Enter Rule Name (description of rule)
- Identify Pay Type(s) included in OT – these pay types should be the pay types associated with core hours (Regular, Hourly, etc.). This setting allows for multiple pay types to be identified.
- Check box with Rule Option.
- Select a Daily Overtime if overtime policy states that rule applies to x hours in a day
- Select Weekly Overtime if overtime policy states that rule applies to x hours in a work week.
- Identify Pay Types from drop down box that contain the overtime pay type that must be used once a user has exceeded the daily and/or weekly overtime rule.
- Click Save
___________________________
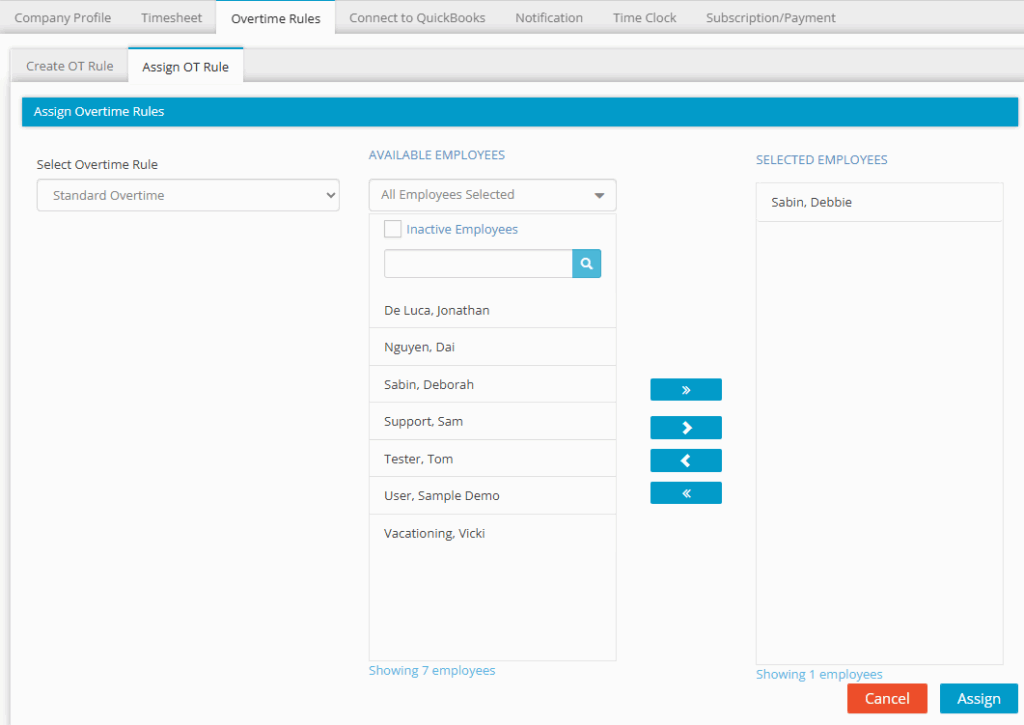
Assigning OT Rules
- Select the rule from the drop-down box
- Move the Employees from the Available box to the Selected box – these can be selected one at a time or be filtered by group.
- Click Assign
___________________________
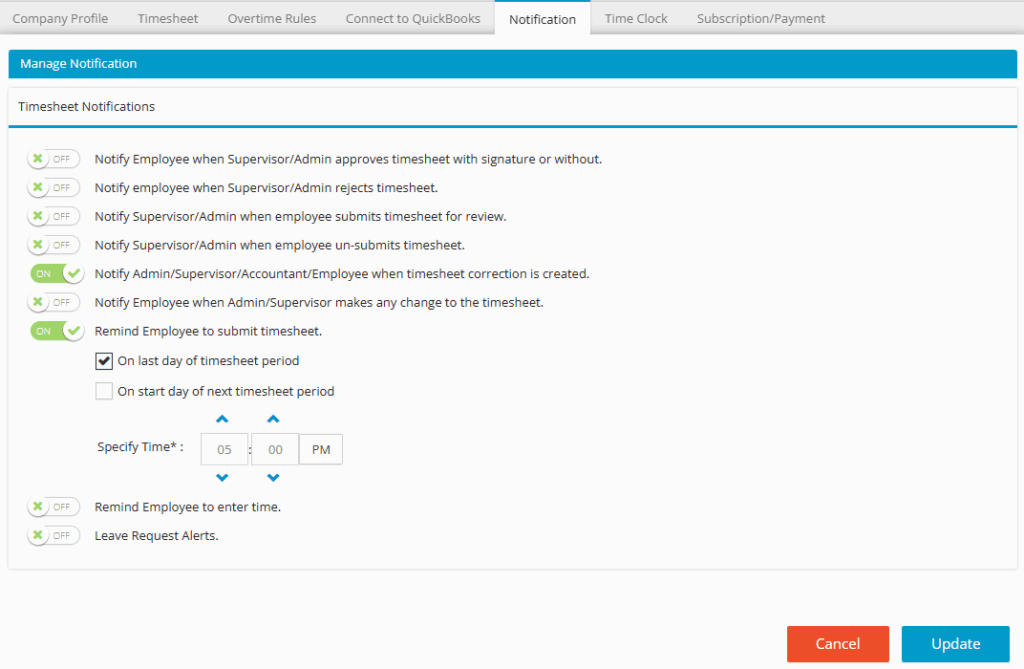
Step 11. Setting Reminders and Email Notifications
The following notifications are available in Hour Timesheet. By default, they are toggled to the off position for all new accounts.
- Login to Hour Timesheet as Admin or Accountant
- Navigate to Settings/Notifications tab
- Toggle rule(s) to On
- Click Update to save changes
___________________________
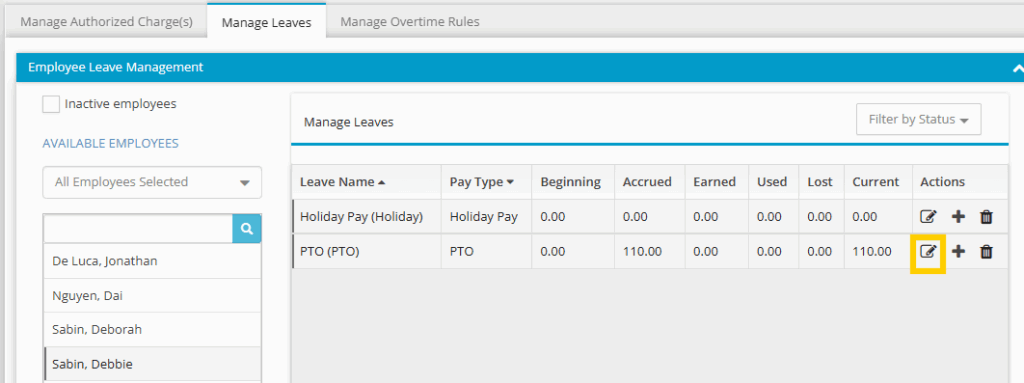
Step 12. Add/Adjust Employee Leave Balances
- Login to Hour Timesheet as Admin or Accountant
- Navigate to Employee/Detail menu
- Select Manage Leaves tab
- Select the employee from the Available Employees list
- Click the icon to edit the balances
- Adjust the required data
- Click Ok
___________________________
Step 13. Sending Employee Invites
Hour Timesheet will import your company’s employee list during the initial data import process. If syncing with QuickBooks, the email address must be populated from within your QuickBooks company file then synced to Hour Timesheet. Employees will use an email address as a login to Hour Timesheet. Each employee will be emailed a signup invitation link and will be able to complete the self-sign-up process by following the steps below:
- Login to Hour Timesheet as Admin
- Navigate to the Employee menu
- Enter employee email address (if missing)
- Click More
- Click Send Invite.
- At this time, the employee will receive an email invitation containing a Sign-Up link
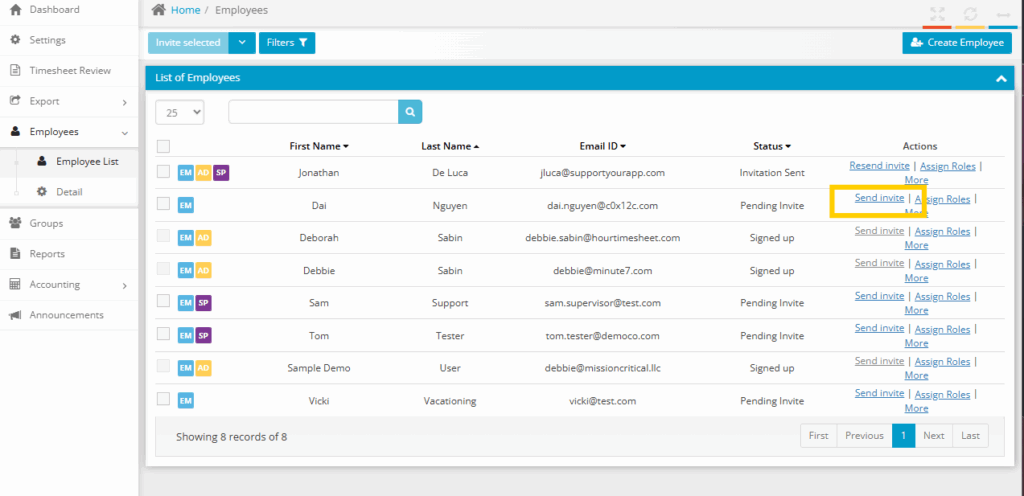
Timesheet Status Options
There are 3 different statuses for employee self-sign-up email invitations from Hour Timesheet
Pending Invite – the employee has not been sent an email invitation to sign up for Hour Timesheet. An email address must be in the email address field to trigger the Send Invite process.
Invitation Sent – the email invitation has been initiated from Hour Timesheet. The status will remain unchanged until the employee completes the sign-up process.
Signed Up – the employee has received the email and clicked the Sign-Up button to initiate the signup process. The link in the email will expire within 72 hours. If necessary, the Admin can resend the sign-up invitation to the employee.