Assigning Leave to Users
Now that your Leave Types and Leave Policies are in place, the final setup step is assigning them to your employees. This is what connects the leave rules you’ve configured to the actual people on your team. Until leave is assigned, employees will not see leave options on their timesheets and will not begin accruing time off. Assignments can be tailored by job role, eligibility, or individual employment agreements.
Before you Begin
Make sure you have completed the following before assigning leave:
- Step 1 — At least one Leave Type has been created (e.g., Sick Leave, Vacation)
- Step 2 — A Leave Policy has been configured for each Leave Type you plan to assign (if applicable)
- You know the effective start date for each employee’s leave — this is typically their hire date or the start of the current benefit year
If you are assigning leave without a policy (for example, a simple bank of hours with no accrual rules), you can skip the Leave Policy selection in Step 6 below.
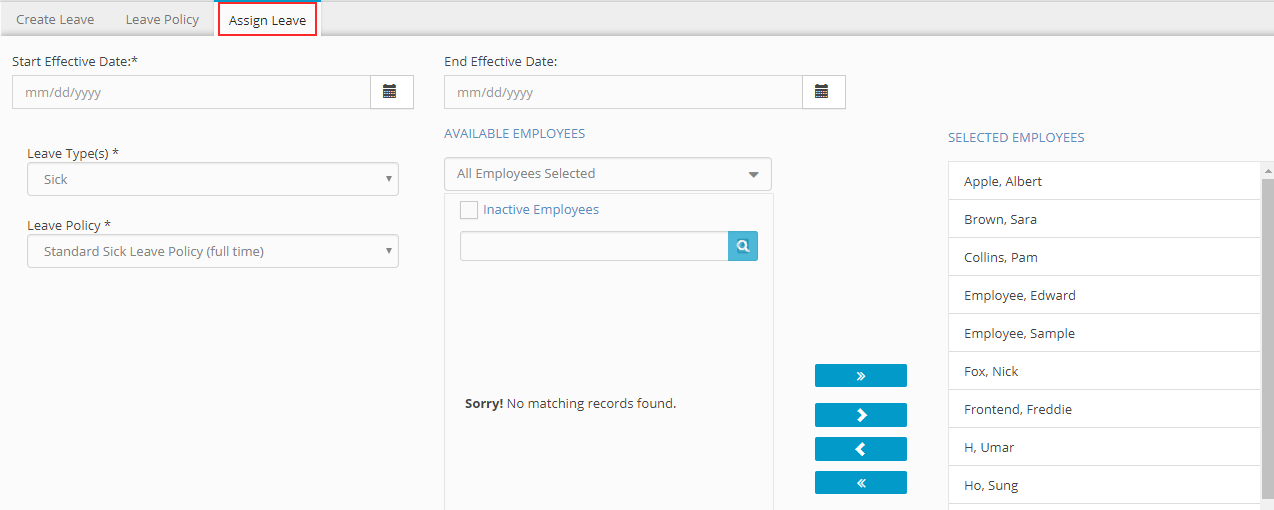
How to Assign Leave to an Employee
Each employee must be linked to the appropriate leave options defined by your organization. Hour Timesheet allows administrators to assign specific Leave Types and Leave Policies based on job roles, eligibility criteria, or individual agreements.
Steps:
- Log in to Hour Timesheet as an Admin or Accountant.
- Navigate to Accounting → Leave in the left menu.
- Click the Assign Leave tab.
- Select a Start Effective Date by clicking the calendar icon — this is the date the leave assignment becomes active for the selected employees.
- Select an End Effective Date (optional) — use this if the leave assignment has a defined expiration, such as for a temporary or contract employee.
- Select a Leave Type from the Leave Types dropdown — for example: Sick Leave or Vacation.
- Select a Leave Policy from the Leave Policy dropdown — choose the policy you configured in Step 2. If no policy applies, leave this blank.
- Select one or more employees from the Available Employees list.
- Click the arrow ( > ) to move the selected employees into the Selected Employees list.
- Click Assign to complete the assignment.Repeat steps 4–10 for each additional Leave Type you need to assign.
Things to Know
Assigning multiple leave types: Most employees will need more than one leave type assigned — for example, both Sick Leave and Vacation. Repeat the process above for each one.
Updating an existing assignment: If an employee changes roles or becomes eligible for a different policy, you can update their assignment by creating a new assignment with a new Start Effective Date. The previous assignment will remain in the system for historical records.
Employees won’t see leave until it’s assigned: If an employee reports that they can’t see leave options on their timesheet, the most common cause is a missing assignment. Double-check that their name appears in the Selected Employees list and that the Start Effective Date is not set to a future date.