Hour Timesheet 2.0 integrates directly with your company’s QuickBooks file — whether you use QuickBooks Desktop (QBD) or QuickBooks Online (QBO). This section walks you through the full setup process, from connecting your QuickBooks file to assigning charge codes and leave policies to employees.
Step 1: Connect and Sync Your Data From Your Company QuickBooks File (Desktop or Online)
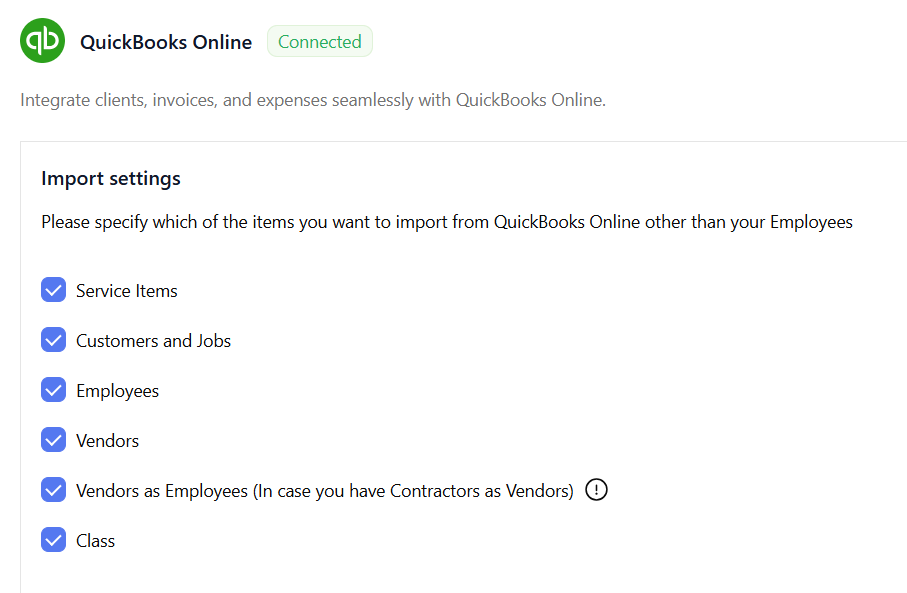
Before importing any data, you must connect Hour Timesheet to your QuickBooks file. This connection allows HTS to read your chart of accounts, service items, customers/jobs, vendors, and employees.
What this step does
Connecting your QuickBooks file allows Hour Timesheet to:
- Pull in your company’s master data
- Sync customers, jobs, service items, and pay types
- Import employees and contractors
Where to connect
Data & Sync → QuickBooks Online / QuickBooks Desktop
Step 2: Map Codes Imported From QuickBooks for Employee Assignment
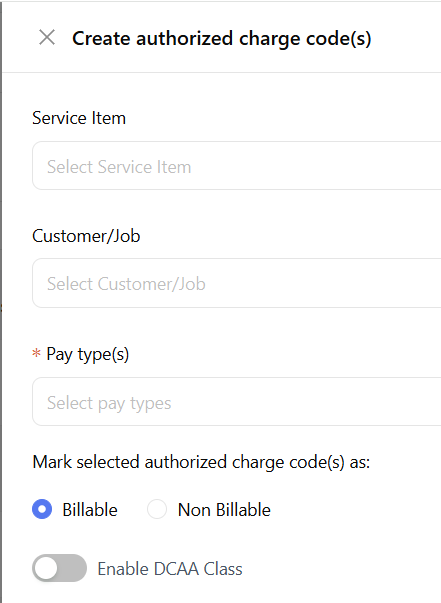
After importing your QuickBooks data, the next step is to map your Customers/Jobs, Service Items, Pay Types, and Classes into Authorized Charge Codes. These mapped codes are what employees will later select when entering time.
What this step does
Mapping creates the “building blocks” of your timekeeping system by combining:
- Customer/Job
- Service Item
- Pay Type (QuickBooks Desktop Only)
- DCAA Class (if applicable)
- Billable/Non‑billable status
Each combination becomes an Authorized Charge Code.
Where to map codes
Charge Code Setup → Charge Code Mapping → Map Codes
Once your charge codes are mapped, you’re ready to assign them to employees.
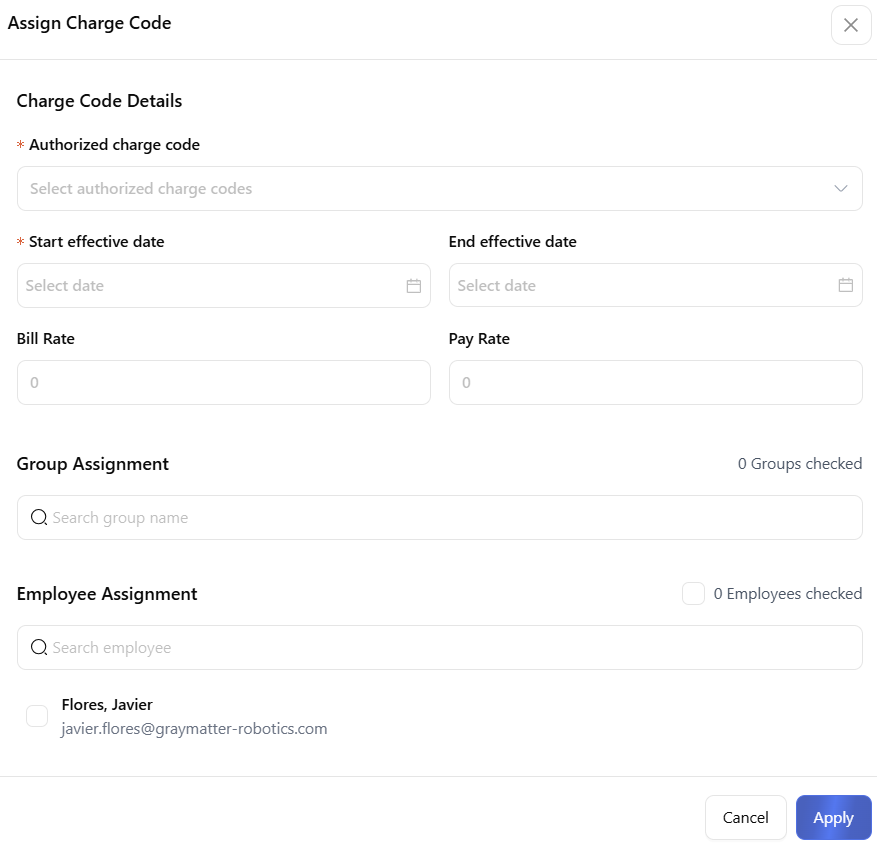
Step 3: Assign Charge Codes to Employees so They Only See the Codes Relevant to Them
Assignments control visibility — employees can only select the charge codes that have been assigned to them. This keeps timesheets clean and prevents miscoding.
What this step does
Assigning charge codes:
- Limits what each employee can charge time to
- Ensures employees only see relevant projects and tasks
- Supports DCAA compliance
Where to assign charge codes
Charge Code Setup → Assignments
Once charge codes are assigned, employees can begin entering time.
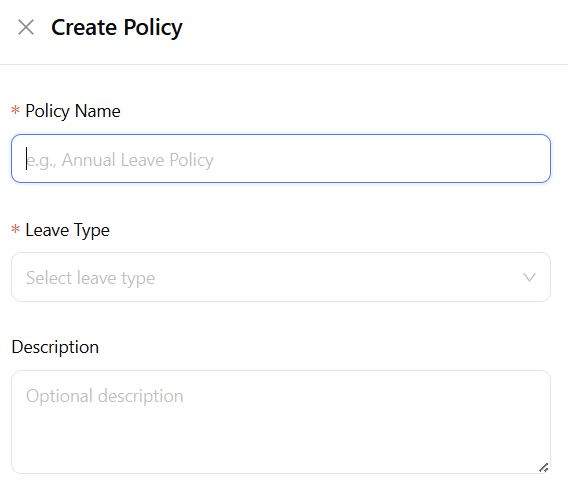
Step 4: Create Leave Types
Leave Types define the categories of time off your organization offers — such as PTO, Sick, Holiday, or any custom leave you need.
What this step does
Creating Leave Types allows you to:
- Establish the types of leave your company supports
- Control how leave appears on employee timesheets
Where to create Leave Types
Leave Management → Leave Type
Once Leave Types are created, you can optionally build Leave Policies.
Step 5: Create Leave Policies (Optional)
Leave Policies define how leave is earned — including accrual rules, carryover limits, and overdraw settings. This step is optional.
Where to create Leave Policies
Leave Management → Leave Policy
Once policies are created, you can configure leave policy Rules
Configure a Rule
A Leave Policy Rule defines how and when employees earn leave. Each rule includes an effective date, an accrual method, carryover behavior, and optional overdraw settings. You can add multiple rules to support different employee groups or changes over time.
What this step does
Leave Policies allow you to:
- Define accrual rules
- Set carryover limits
- Control overdraw permissions
- Establish effective dates
Where to create Leave Policies
Leave Management → Leave Policy → Configure Rule → Add Rule
Effective Date: Determines when this rule becomes active.
- Leave Rule Effective From Choose the date the rule should begin applying to employees.
- From Hire Date of Employee Select this if accruals should begin based on each employee’s individual hire date rather than a fixed calendar date.
- After Duration Use this when employees must wait a certain period (e.g., 90 days) before they begin accruing leave.
Accrual Rules: Define how leave is earned.
- Accrual Type Choose the method used to calculate earned leave:
- Time‑based Accrual — Employees earn a fixed amount on a schedule (e.g., annually, monthly, per pay period).
- Work‑based Accrual — Employees earn leave based on hours worked.
- Accrual Frequency Select how often accruals occur (e.g., yearly, monthly, biweekly, weekly).
- Accrual Quantity Enter the number of hours earned each cycle.
- Maximum Accrual Set a cap on how many hours can be earned under this rule. Select Unlimited if no cap applies.
Accrual Expiration & Carry Over: Controls what happens to unused leave at the end of an accrual cycle.
- Carry Over: Enable this if employees are allowed to carry unused hours into the next cycle.
- Leave Balance Carry Over Frequency: Choose how often carryover is evaluated (e.g., yearly).
- Maximum Carry Over: Set the maximum number of hours that can be carried forward. Select Unlimited if no limit applies.
- Carry Over Expiration: Define when carried‑over hours expire, if applicable.
Overdraw: Controls whether employees can submit leave requests that exceed their current balance.
- Allow Overdraw
Enable this if your organization permits negative leave balances.
Step 6: Manage and Assign Leave to Users
Assignments determine which employees are eligible for each type of leave and which policy rules apply to them.
What this step does
Assigning leave:
- Determines which employees can request each leave type
- Applies the correct accrual rules
- Ensures leave balances calculate correctly
- Controls eligibility
Where to manage leave assignments
Leave Management → Manage Assignments → Assign Leave
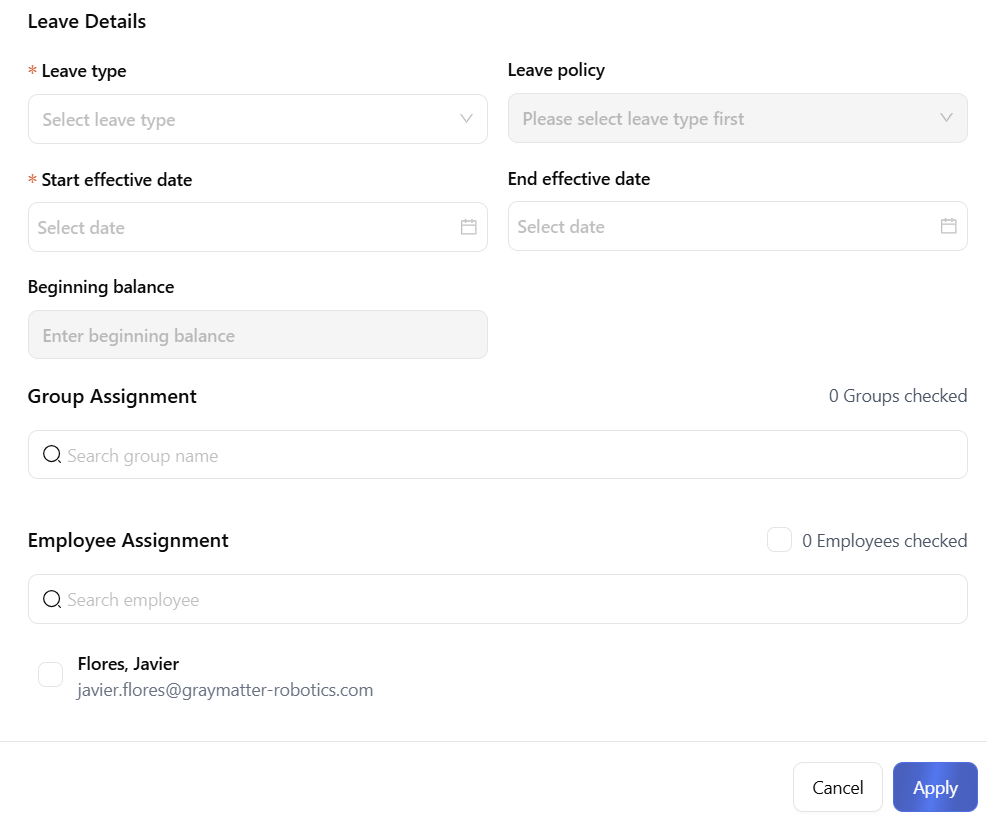
Once leave assignments are complete, employees are fully set up to request and track leave in Hour Timesheet 2.0.
Step 7: Update Employee Leave Balances
Once a leave type and leave policy have been properly created and assigned to an employee, you can manually adjust their balance at any time. Adjustments are typically used for onboarding corrections, PTO payouts, manual grants, or reconciling historical balances.
Where to Adjust Leave Balances
People → User Detail → Manage Leave
- Go to the Employees List. Navigate to Employees and select the employee whose balance you need to update.
- Locate the Leave Type to Adjust: Find the row for the specific leave (e.g., PTO, Sick, Holiday).
- Click the Edit (✏️) Icon: This opens the leave assignment details for that employee.
- Update the Balance Fields: Depending on your system configuration, you may adjust:
- Beginning Balance — Used for initial setup or correcting starting values.
- Accrual or Earned — Used only when making manual grants.
- Used — Rarely edited manually unless correcting historical entries.
- Lost — Used when manually expiring hours..
- Save Changes: Click Save to apply the updated balance. The new value will immediately reflect in the employee’s Current Balance and Available Balance.
When to Use a Manual Adjustment
- Set up of a new HTS account in the middle of a calendar year
- An employee is newly onboarded and needs an initial PTO bank.
- HR is granting additional hours (e.g., bonus PTO).
- You are correcting a historical discrepancy.
- You are reconciling balances after a policy change.
- You need to expire or remove hours outside of normal carryover rules.