Step 1: Configure Timesheet Settings
Timesheet Settings define how often employees submit their timesheets. This ensures your approval workflow aligns with your payroll cycle, billing cycle, or internal reporting requirements.
Where to configure Timesheet Settings
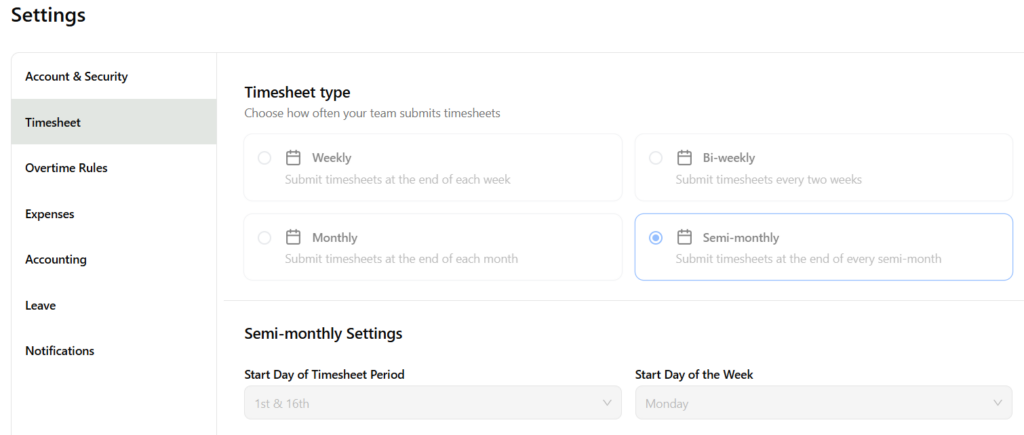
Settings → Timesheet
Available Timesheet Periods
You can choose from four submission cycles:
- Weekly — Employees submit a timesheet every week
- Bi‑weekly — Submit every two weeks
- Semi‑monthly — Submit twice per month (e.g., 1st–15th, 16th–end)
- Monthly — Submit once per month
Select the option that matches your organization’s payroll or billing schedule. Once saved, all employees will follow this submission cycle.
Step 2: Configure Business Rules (Time Entry Settings)
Business Rules control how time entries behave — including rounding, approval requirements, and restrictions on past or future entries. These rules help maintain accuracy, compliance, and consistency across your team.
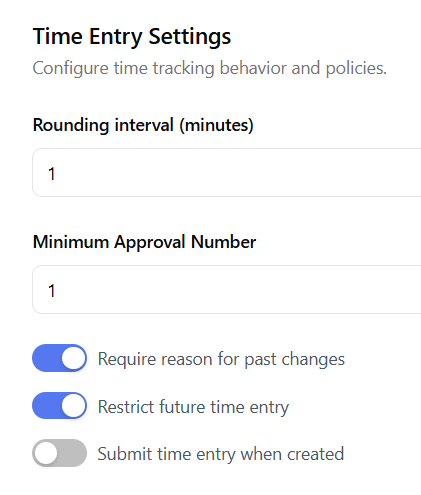
Where to configure Time Entry Settings
Settings → Time Entry Settings
Key Settings Explained
- Rounding Interval (minutes)
Determines how time entries are rounded (e.g., to the nearest 1, 6, or 15 minutes). - Minimum Approval Number
Sets how many approvals are required before a timesheet is considered fully approved. - Require Reason for Past Changes (toggle)
When enabled, employees must provide a reason when editing past time entries. - Restrict Future Time Entry (toggle)
Prevents employees from entering time for future dates. - Submit Time Entry When Created (toggle)
Automatically submits entries as soon as they are created (most organizations leave this off to allow edits before submission).
Step 3 – Configure Overtime Rule(s)
Overtime rules determine how Hour Timesheet 2.0 calculates daily, weekly, and special‑case overtime for your organization. These rules ensure that employee hours flow correctly into payroll and that your company remains compliant with federal, state, and contract‑specific labor requirements.
This section walks you through creating and configuring overtime rules, including support for California Overtime, Double Time, and Seventh Consecutive Day rules.
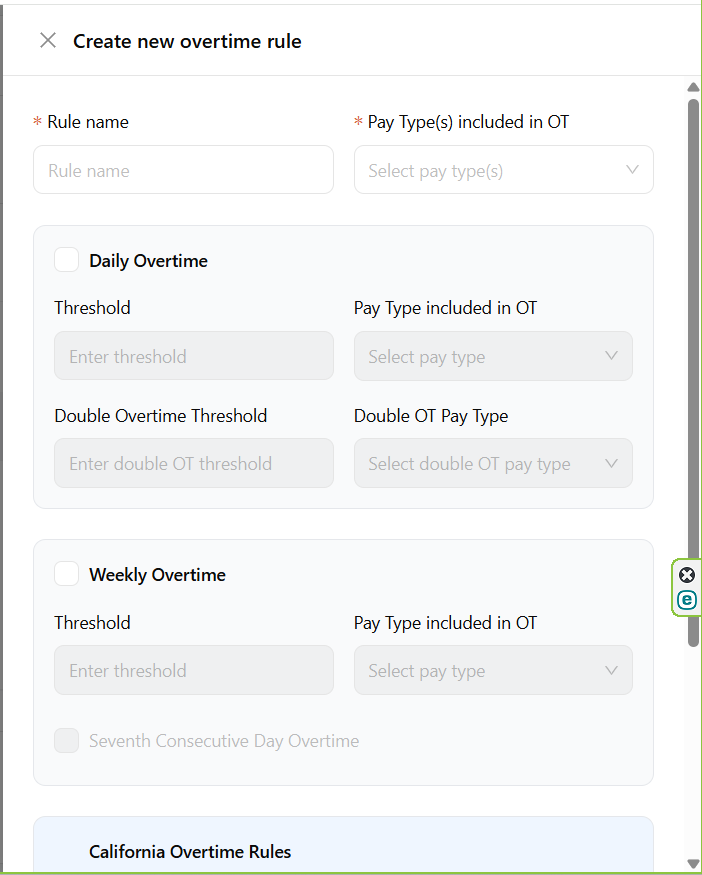
Create a New Overtime Rule
Overtime rules define when overtime begins and which pay types are included. You can configure daily thresholds, weekly thresholds, double‑time rules, and state‑specific requirements.
Where to create overtime rules Settings → Overtime Rules
Daily Overtime Settings Daily overtime applies when an employee exceeds a certain number of hours in a single workday.
You can configure:
- Daily OT Threshold
Example: 8 hours → anything above 8 becomes overtime. - Daily OT Pay Type
Example: “Overtime Hourly” - Double Time Threshold
Example: 12 hours → anything above 12 becomes double time. - Double Time Pay Type
Example: “Double OT Hourly”
Weekly Overtime Settings Weekly overtime applies when an employee exceeds a set number of hours in a workweek.
You can configure:
- Weekly OT Threshold
Example: 40 hours → anything above 40 becomes overtime. - Weekly OT Pay Type
Example: “Overtime Hourly”
California Overtime Rules If your organization follows California labor law, you can enable:
- Daily OT after 8 hours
- Double Time after 12 hours
- Seventh Consecutive Day Overtime
- Seventh Consecutive Day Double Time
These rules are built into the configuration screen and can be toggled on as needed.
Step 4. Setup and Configure Groups
Groups allow you to organize employees into logical teams so supervisors only see and manage the people they are responsible for. This keeps your account structured, secure, and easy to navigate as your organization grows.
What Groups Are Used For
- Supervisor visibility control — Supervisors only see timesheets, expenses, leave requests, and reports for employees in their assigned group.
- Approval and management actions — Supervisors can approve or reject timesheets and expenses, run reports, and update records on behalf of employees who are unable to complete their entries (for example, due to travel or sick leave).
- Department or location segmentation — Create groups for departments, job roles, project teams, or physical locations.
- Flexible membership — Employees can belong to one or multiple groups depending on your workflow.
- Cleaner approvals and reporting — Supervisors work within their defined scope, reducing errors and unnecessary access.
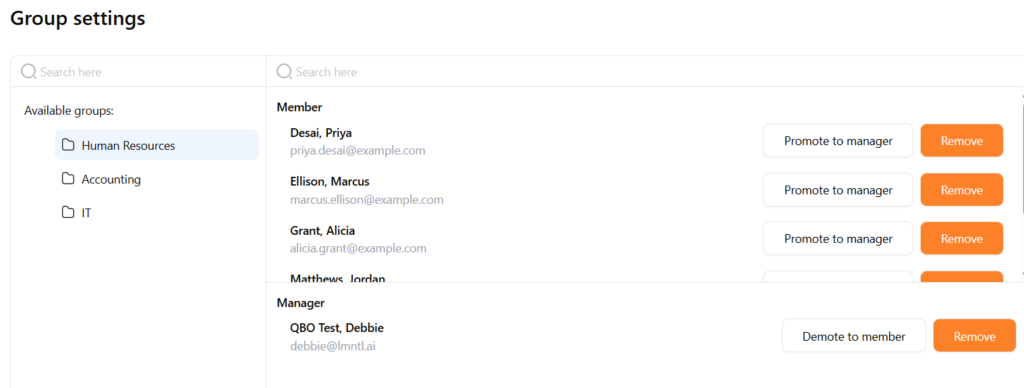
Where to configure People → Group Setting → Add New Group
How to Set Up a Group
- Enter a Group Name.
- (Optional) Choose a Parent Group if you want to build a hierarchy.
- Add a Description to clarify the purpose of the group.
- Use the employee list to select the users who belong in this group.
- Toggle Show inactive employees if you need to include users who are not currently active.
- Click Create to save the group.
Assigning Supervisors to a Group
- Open the group from the Groups list.
- Select Promote to Manager.
- Choose one or more supervisors who should manage this group.
Important: Supervisors only have access to the employees in the groups they are assigned to.
Step 5. Manage Users
The User Management area allows administrators to add new employees, update user profiles, assign roles, and maintain accurate compensation and employment records.
Each user profile contains required and optional fields that define how the employee appears in the system and how their time and labor data is processed.
Required Information
- First Name / Last Name — Used throughout the system for timesheets, approvals, and reporting.
- User ID — A system‑generated unique identifier for the employee.
- Hire Date — Determines eligibility for leave rules, accruals, and reporting.
- Role — Defines the user’s permissions (Employee, Supervisor, Admin).
- Time Zone — Ensures timesheet entries and approvals align with the employee’s local time.
Optional Information
These fields are not required but strongly recommended for accurate reporting and payroll processing.
- Display Name — How the user’s name appears in dashboards and reports.
- Email — Required for login, password resets, and notifications.
- Password — Can be set manually or via invitation.
- Termination Date — Used to deactivate users and prevent future time entry.
- Phone Number — For contact and supervisor reference.
- Start Day of Week — Controls how the employee’s timesheet period is displayed.
- Inactive Employee Toggle — Marks the user as inactive without deleting historical data.
Compensation Data
Compensation settings determine how the employee’s labor costs are calculated and exported to payroll or accounting systems.
- Pay Type — Hourly or Salary.
- Pay Cycle — Weekly, bi‑weekly, semi‑monthly, or monthly.
- Salary Amount / Hourly Rate — Used for labor cost distribution and reporting.
Editing an Existing User
- Open User List and select the employee.
- Update profile fields as needed (name, email, role, compensation, etc.).
- Save changes.
- If the user is no longer active, set a Termination Date and toggle Inactive Employee.
Roles Overview
- Employee — Can enter time, submit timesheets, and request leave.
- Supervisor/Manager — Can approve/reject timesheets and expenses, run reports, update records for employees who cannot enter their own time, and manage group‑assigned employees.
- Admin — Full system access, including settings, user management, payroll exports, and reporting.
Step 5: Configure Expense Tracking Settings
Where to configure Expense Tracking Settings Settings → Expense Tracking
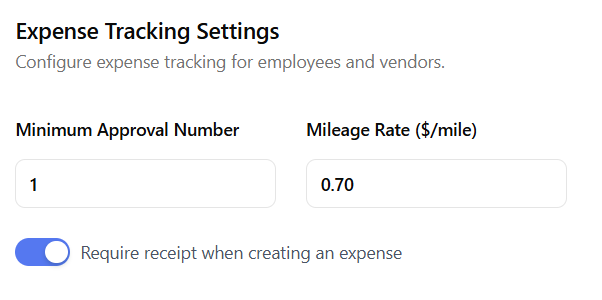
What You Can Configure
- Minimum Approval Number Set the number of approvals required before an expense is considered fully approved.
Most organizations use 1, but you may increase this for:
- Government contracting
- Multi‑level financial review
- High‑value expense oversight
2. Mileage Rate ($/mile) Enter your organization’s reimbursement rate for mileage. This rate is automatically applied when employees submit mileage expenses.
3. Require Receipt When Creating an Expense (toggle) When enabled, employees must upload a receipt before submitting an expense.
This is recommended for:
- Audit compliance
- DCAA requirements
- Corporate card reconciliation
- Vendor reimbursement tracking
If disabled, receipts become optional.
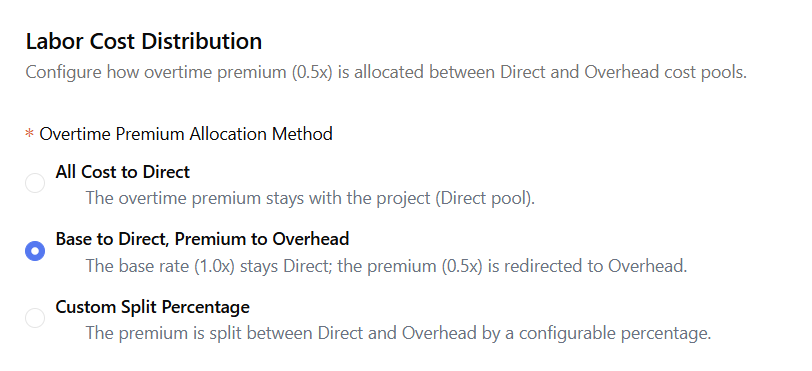
Step 6: Labor Cost Distribution Settings
Configure how overtime premium (0.5x) is allocated between Direct and Overhead cost pools. This setting determines where the premium portion of overtime (the additional 0.5x above the base hourly rate) is recorded for labor distribution and cost reporting.
Where to Find: Settings →Accounting → Labor Cost Distribution
Step 7: Timesheet Notifications
Enable automated notifications to keep employees, supervisors, and administrators informed about key timesheet events. Each notification can be turned On or Off depending on your organization’s workflow and communication preferences.
Available Notification Types
- Notify Supervisor/Admin when an employee submits a timesheet for review
Sends an alert as soon as the employee submits their timesheet, prompting timely review and approval. - Notify Employee when Supervisor/Admin approves a timesheet
Notifies the employee when their timesheet has been approved, with or without a signature. - Notify Employee when Supervisor/Admin rejects a timesheet
Alerts the employee immediately if their timesheet is rejected so they can make corrections and resubmit. - Notify Employee and Supervisor when an Admin makes any change to a timesheet
Ensures full transparency by informing both parties whenever an administrator updates or adjusts a timesheet.
Where to Configure
These settings are located under: Settings → Timesheet Notifications