Who is this article for
HTS users who want to use Hour Timesheet to manage employee leave balances
HTS users who want to track leave time on the timesheet
HTS users who want to use the HTS Leave Request feature
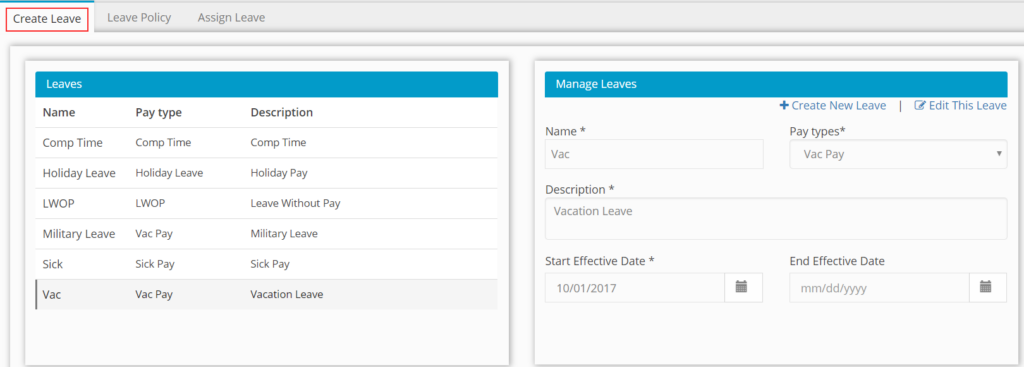
Create Leave Types
Leave Types created in Hour Timesheet are associated with leave payroll items previously created in your accounting software. To create a leave type in Hour Timesheet:
- Login to Hour Timesheet as Admin or Accountant
- Navigate to Accounting→ Leave sub menu
- Click Create New Leave
- Enter Leave Name
- Select Pay Type from drop down box (this should be the list of leave pay types imported from QuickBooks)
- Enter Leave Description
- Enter Start Effective Date of new leave type
- Click the Save button to complete.
- Repeat steps 1-9 above for each leave type.
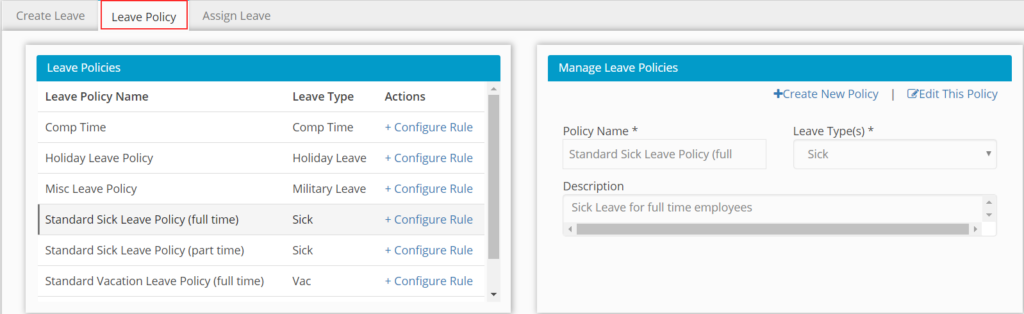
Creating Leave Polices
- Login to Hour Timesheet as Admin or Accountant.
- Navigate to Accounting→ Leave sub menu.
- Click the Leave Policy tab
- Click Create New Leave Policy.
- Enter Policy Name. (Sample: Standard FT Sick Leave Policy)
- Select Pay Type from the Select Leave Type drop down box. (Sample: Sick Leave)
- Enter Leave (Sample: Standard Sick Leave Policy for Full Time Employees)
- Click the Save button to complete.
- Repeat steps 1-8 above for each leave type.
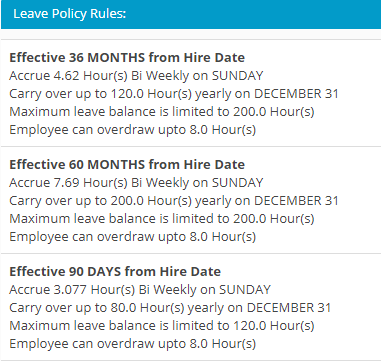
Configuring Leave Policy Rules
- Click the Leave Policy tab
- Click the +Configure Rule text next to the leave to be configured.
- Complete the following:
- Leave Rule Effective From – Click the radio button for one of the two options below for this setting.
From Hire Date of Employee – Runs the accrual from each employee’s hire date.
After [user defined] Duration from employees hire date – Accrual for each employee will not begin until duration time is complete.
- Frequency of Accrual – this field is to define the period of time in which an accrual will run. Examples (weekly, bi-weekly, semi-monthly, monthly, annually)
- Accrual Quantity – this field is used to define the rate at which the leave will be earned for each of the frequencies identified above.
- Leave Balance Carry Over Frequency – if leave balance carries over from one period to another, the user will be able to define the date on which the carryover occurs.
- Max Balance – this feature allows the user to set the maximum number of hours for each type of leave that an employee may carry on the books. Once this value is reached for each employee, the remaining hours will be accounted for as Lost hours.
- Max Overdraw – this feature allows the user to define the number of hours that an employee may go “into the negative” for each type of leave.
- Click Ok
- Repeat steps above for each leave policy.
General notes about Leave Policy enforcement
Timesheet behavior is dependent on setup of leave policy.
Balance is reduced after timesheet is submitted at the end of each timesheet period.
User receives error message upon entering time that exceeds current balance.
User may be allowed to “go into the negative” if feature is configured.
System will stop accruing leave once limit “ceiling” is reached. Additional leave earned or accrued after leave ceiling is reached is moved to the “lost” column.
System will reset balance to “carry-over” value each year
Assign Leave Type to Employee(s)
Users with the supervisor, admin or accounting roles may view individual leave balances for each employee.
Employees will not be able to see leave types using the Add Leave Hours section on the timesheet until leave is assigned.
Employees will not start accruing leave until leave has been assigned.
Creating Leave associations by employee is required so that the timesheet can select “Add Leave Hours” from the employee timesheet.
To assign Leave Types to an Employee:
- Login to Hour Timesheet as Admin or Accountant
- Navigate to Accounting→ Leave sub menu
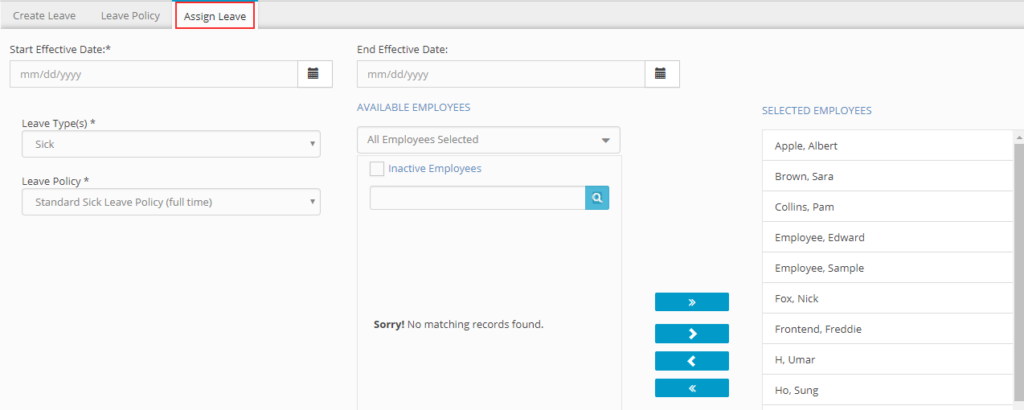
- Select Assign Leave
- Click the calendar icon box to select a Start Effective Date and End Effective Date (optional)
- Select a Leave Type from Available Leaves selection box.
- Select a Leave Policy from Select Leave Policy selection box.
- Select from the Available Employees from Available Employees selection box.
8. Click the> to move the Employee(s) to the Selected Employees list box.
- Click the Assign button to complete.
- Repeat steps 1-9 above for each leave type.
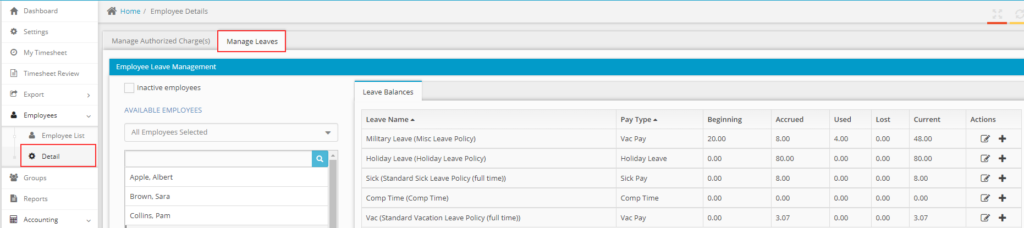
Add/Adjust Employee Leave Balances
- Login to Hour Timesheet as Admin or Accountant
- Navigate to Employee/Detail menu
- Select Manage Leaves tab
- Select the employee from the Available Employees list
- Click the icon to edit the balances
- Adjust the required data
- Click Ok