Hour Timesheet Setup Guide
Follow the steps below to confiture your account
- Step 1: Configure Timesheet Settings/Business Rules
- Step 2: Adding Users (Employees & Consultants) & Job Codes
- Step 3: Assign User Roles
- Step 4: Create Groups
- Step 5: Map/Associate Charge Code Data
- Step 6: Assign Employee Charge Codes
- Step 7: Create Leave Types
- Step 8: Create Leave Policies
- Step 9: Assign Leave to Employees
- Step 10: Create Overtime Rules
- Step 11: Setting Reminders and Email Notifications
- Step 12: Send Employee Invites
Step 1. Configure Timesheet Settings/Business Rules
- Login to Hour Timesheet as an admin
- Navigate to the Settings menu
- Click the Timesheet tab
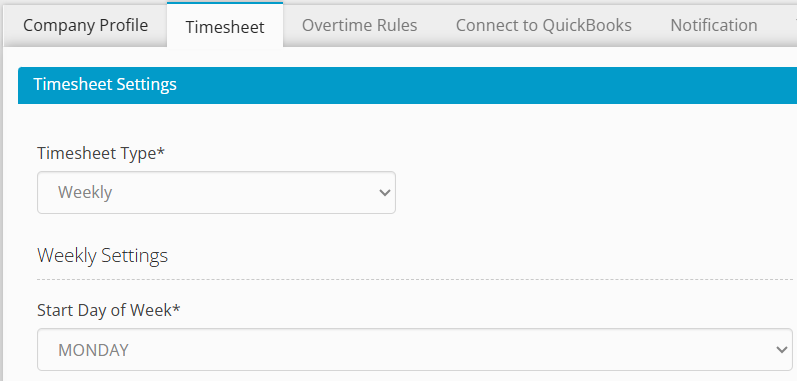
Step 1.a Timesheet Settings
Timesheet Type – This is the timesheet period. Timesheet options are: Weekly, Biweekly, Semi-monthly or Monthly
Start Day of the Week – This is the day of the week that you would like your timesheet to begin on (Sunday, Monday, Tuesday, etc.).
Step 1b. Business Rules
- Login to Hour Timesheet as an admin
- Navigate to the Settings menu
- Click the Timesheet tab
- Capture reason for any changes made in previous days: Prompts users to explain edits to prior days’ timesheets or why a current day has no time entries.
- Recommendation: Check this box for DCAA Compliance.
- Restrict Employees from charging work hours in advance: Prevents users from entering time on future days for work hours only. Leave may be entered in advance.
- Recommendation: Check this box for DCAA Compliance.
- Track and export leave hours against charge codes: For QuickBooks users only. Associates leave time entries with specific job codes/service items for detailed project-level reporting. Click here for more info
- Restrict Employee to edit/delete clock in/out value once added: Enforces time clock integrity by preventing modification of time punches from mobile app, web clock, or physical time clocks.
- Define custom message for timesheet submission popup: This field allows administrators to enter and customize the attestation statement that employees must acknowledge during timesheet sign‑off
- Minimum Hours Validator Rule: This rule verifies that an employee’s hours meet your defined minimum for the day, week, or timesheet period before allowing submission.
Step 2: Adding Users (Employees & Consultants)
Option 2a. QuickBooks Online
You are able to select which data elements to sync between your QuickBooks company file and Hour Timesheet. The sync process should be run each time new data is entered in your company QuickBooks file. This tool will sync the following info:
- Employees
- Customer/Jobs
- Service Items
- Classes
- Vendors (1099’s and subcontractors)
NOTE: Hour Timesheet does not allow Customer/Jobs, Service Items, Classes or Vendor data to be added through the Hour Timesheet software. You must add the data to your QuickBooks company file first to sync the data. Hour Timesheet does allow for employee data to be created using the software, but these employees WILL NOT sync timesheet data back into your QuickBooks file.
- Login to your Hour Timesheet login page as user with admin or accountant role
- Navigate to the Settings menu item
- Click the Connect to QuickBooks tab (this article requires that the connection to your QuickBooks Online company file has already been established during the setup of Hour Timesheet.
- Place a check in the box next to the data that you would like imported From QuickBooks Online into Hour Timesheet
- Click the Import button to initiate the import process.
For detailed instructions click here
Option 2b. QuickBooks Desktop
Hour Timesheet utilizes the QuickBooks Web Connector to enable the exchange of data between your company file in QuickBooks Desktop and Hour Timesheet. The import process should be run each time new data is entered in your QuickBooks company file.
The import tool will sync the following:
- Employees
- Customer/Jobs
- Service Items
- Classes, Vendors (1099’s and subcontractors)
- Payroll Items
NOTE: Hour Timesheet does not allow Customer/Jobs, Service Items, Classes or Vendor data to be added through the Hour Timesheet software. You must add the data to your QuickBooks company file first to sync the data. Hour Timesheet does allow for employee data to be created using the software, but these employees WILL NOT sync timesheet data back into your QuickBooks file.
- Login to your Hour Timesheet login page as user with admin or accountant role
- Navigate to the Settings menu item
- Click the Connect to QuickBooks tab
- Click the Request for Import button to initiate the import process.
- Open your QuickBooks company file and navigate to the File/Update Web Services menu item.
- Place a check in the box next to the Hour Timesheet Web Connector and click the Update Selected button.
NOTE: The import process is not immediate and may take some time (up to 60 minutes). Once the data import process is complete, you will receive an email with the details of the import.
For detailed instructions click here
Option 2c. Stand-Alone (no sync with payroll software)
Clients who choose to use the standalone Hour Timesheet subscription (without connecting to QuickBooks Online or QuickBooks Desktop) will follow a slightly different setup process. This ensures the account is configured correctly for time entry, approvals, and payroll reporting within Hour Timesheet itself.
To view the full step‑by‑step instructions for setting up a standalone account, click here.
Step 3. Assign User Roles
Hour Timesheet Roles
After setting up your new site, you will need to establish system roles. By default, all users are assigned the employee role and the creator of the site is assigned the Admin role.
- EMPLOYEES – System role allowing users access to individual timesheet entry, leave request and reporting feature
- SUPERVISORS– The supervisor feature is created to provide specific users access to features and functions within Hour Timesheet. Supervisors have access to the following:
- Review Timesheet – create, approve, edit and reject employee timesheet data
- Run Reports – access to real-time reporting data
- Approve Employee Leave Request
- ADMINISTRATORS– System role allowing management of data to/from company payroll file.
- Oversees all system‑wide settings, including overtime rules, timesheet periods, and notification preferences
- Exports approved timesheet data to supported accounting and payroll systems
- Runs reports for auditing, payroll, and management needs
- Assigns and maintains charge codes, leave types, and payroll items for groups and employees
Setting User Roles
- Login to Hour Timesheet as an admin
- Navigate to the Employee List menu
- Identify the users from the list that are Supervisors, Accountants or Admins and click the Assign Roles link.

Step 4. Create Groups
Groups organize employees by department, location, or reporting structure to streamline approval workflows and reporting.Employee Groupings: The Foundation for Organized Operations.
Groups serve as the fundamental structure for categorizing employees. These groupings are strategically designed to organize personnel based on key attributes such as their department (e.g., Sales, Marketing, Engineering), physical location (e.g., Headquarters, Remote Office A, Factory B), or their position within the company’s reporting structure (e.g., Leadership, Mid-Management, Staff).
- Login to Hour Timesheet as Admin or Accountant
- Navigate to Group menu
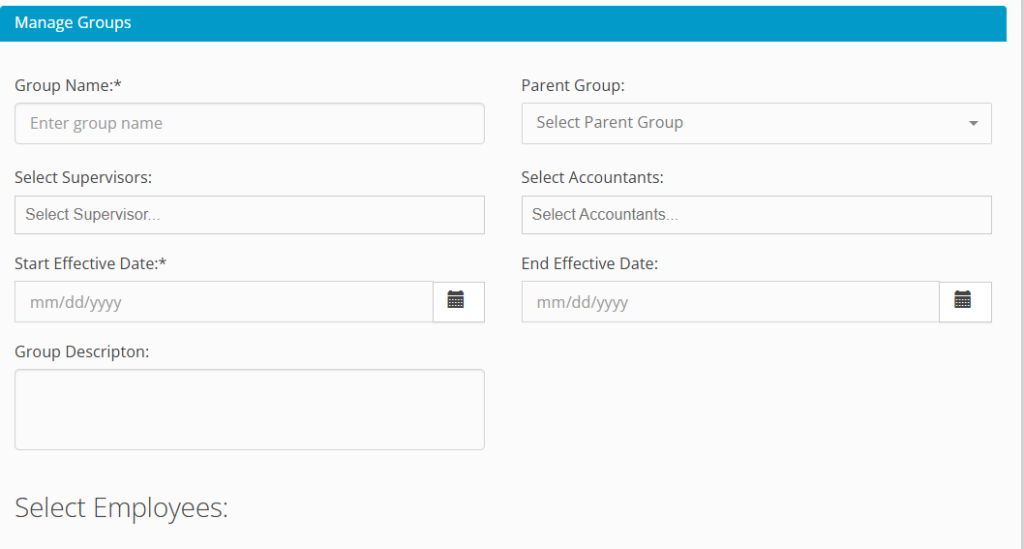
- Click New Group or Edit Group link
- Enter group detail
- Enter group supervisor – see Note 1 below
- Click employee(s) to be associated to group
- Click the > icon
- Click the Save button to complete
For additional details on creating and using the Group feature in Hour Timesheet, click here.
Note 1 SUPERVISORS – System role allowing users to manage employee timesheet data. This includes approving, rejecting and editing employee timesheet data as well as running reports.
Note 2 – By default, ADMINISTRATORS have access to Supervisor privileges.
Step 5. Map/Associate Charge Code Data
Mapping is important when setting up the system because it makes sure you’re only using valid combinations of charge codes. Basically, it stops people from accidentally putting in bad data. By setting up these allowed pairings, the system keeps everything consistent and accurate. For more information, click here.

- Navigate to the Accounting/Codes menu
- Click the Create New button
- Select the Customer/Job to expand the list of Select Charge Codes. Select from the list the Customer/Job(s) needed for association to employee(s) REQUIRED
- Select the Service Item to expand the list of Select Service Items. Select from the list the Service Items needed for association to employee(s) OPTIONAL
- Select the Class list to expand the list of Select Classes. Select from the list the Classes needed for association to employee(s) OPTIONAL
- Select the Pay Type to expand the list of Select Pay Type(s). Select from the list the Pay Types needed for association to employee(s) OPTIONAL
- Click the Add button
Step 6. Assign Employee Charge Codes
Creating charge code associations for each employee will limit what the user is able to charge to when entering hours on a timesheet. Employees can have multiple charge code associations and charge codes can be assigned to multiple employees. To create charge code associations, follow the steps below:
- Navigate to the Accounting/Codes menu
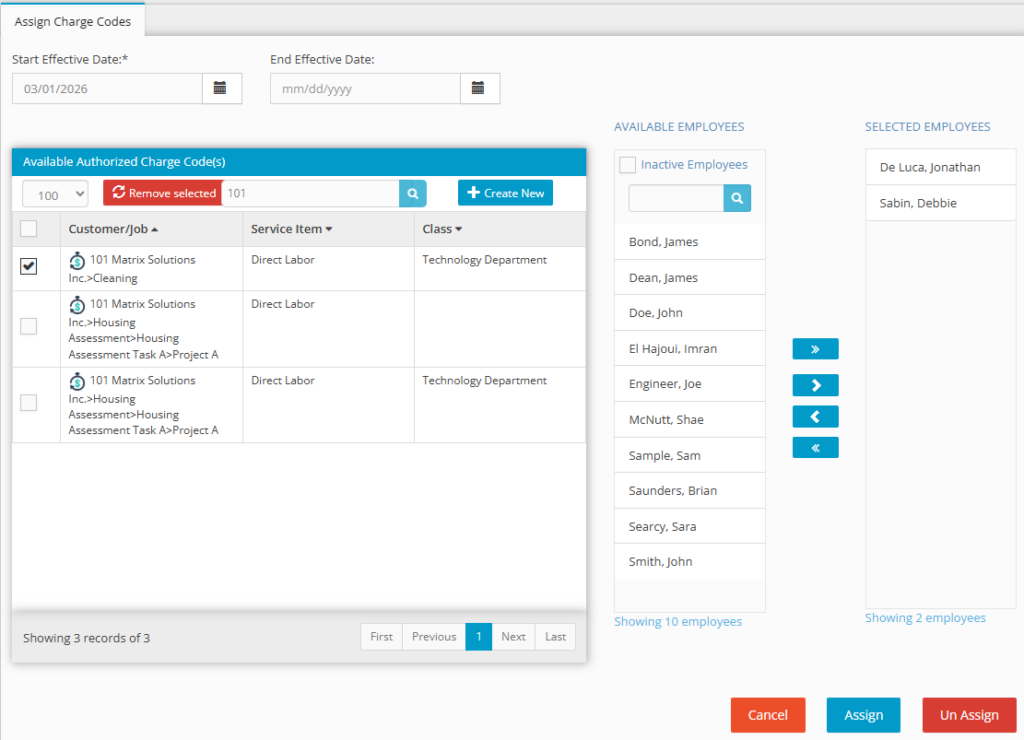
- Place a check in the Available Authorized Charge Code(s) – created in previous setup process.
- Select from the Available Employees list the appropriate employees to be associated to the Available Authorized Charge Code(s) from above.
- Click the > to move the selected employees from #8 above to the selected employee list box
- Click the calendar icon box to select a Start Effective Date and End Effective Date (optional)
- Click the Assign button to complete.
NOTE If no charge code associations are created, employees will have access to all codes.
Step 7. Create Leave Types
Hour Timesheet (HTS) is designed to handle a variety of leave types to accommodate different organizational policies and labor laws. Specifically, HTS supports three core categories of leave time for employees:
Accrued Leave: This is a standard leave type that is typically based on an employee’s hire date and a pre-defined accrual frequency (e.g., weekly, bi-weekly, monthly, or annually). Accrued Leave accumulates automatically over time and is generally intended for vacation, sick time, or personal days, depending on the company’s specific plan. The system calculates the eligible leave balance based on these set parameters.
Earned Leave: Unlike Accrued Leave, which is time-based, Earned Leave is calculated based on the actual hours an employee has worked. For example, an employee might earn one hour of leave for every 40 hours worked. This method is often used to ensure that part-time or hourly employees earn leave proportionate to their service contribution, or to comply with state or local laws requiring sick leave to be earned based on time worked.
Compensatory Time (Comp Time): Comp Time is a distinct category of leave that is typically earned after an employee meets specific, pre-determined criteria, often involving working hours beyond their standard schedule (e.g., overtime). Instead of receiving immediate monetary payment for the extra hours, the employee earns time off at a specified rate (e.g., time-and-a-half). HTS tracks this earned Comp Time balance, which is then available for the employee to use as paid time off, subject to company policies regarding usage and payout.
Create Leave Types
A leave type in Hour Timesheet is the category that defines what kind of time off an employee is taking—such as vacation, sick, holiday, or any custom leave your organization uses. It acts as the foundation for all leave-related rules, balances, and accruals because policies are always built on top of a specific leave type. Once created, leave types are assigned to employees so Hour Timesheet knows which balances to track and which policies to apply when they record time off.
Leave Types created in Hour Timesheet are associated with leave payroll items (from QuickBooks Desktop) or Service Item (QuickBooks Online) previously created in your accounting software. To create a leave type in Hour Timesheet:
- Login to Hour Timesheet as Admin or Accountant
- Navigate to Accounting→ Leave sub menu
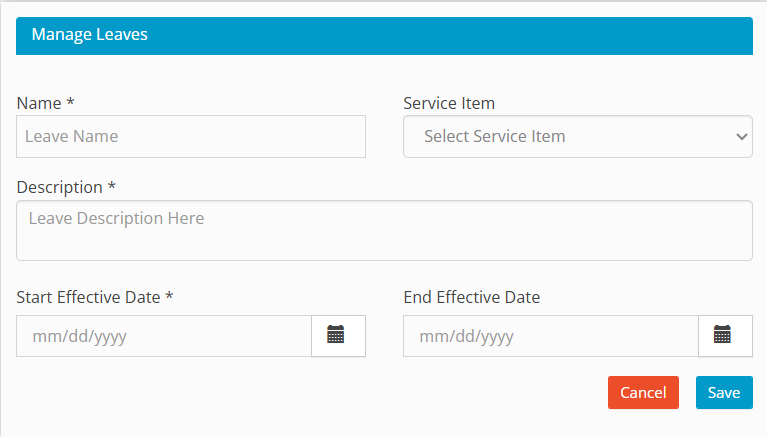
- Click Create New Leave
- Enter Leave Name
- Select Pay Type or Service Item from drop down box (this should be the list of leave pay types imported from QuickBooks)
- Enter Leave Description
- Enter Start Effective Date of new leave type
- Click the Save button to complete.
- Repeat steps 1-6 above for each leave type.
Step 8. Create Leave Policies
Leave Policies define the rules for how employees earn and use each type of leave — things like how quickly leave accrues, whether unused hours carry over, and how much time an employee can take in advance. This step is optional but recommended for any organization that wants to automate leave tracking and ensure consistency. For detailed instructions on creating leave policies, click here
Creating Leave Polices
- Login to Hour Timesheet as Admin or Accountant.
- Navigate to Accounting→ Leave sub menu.
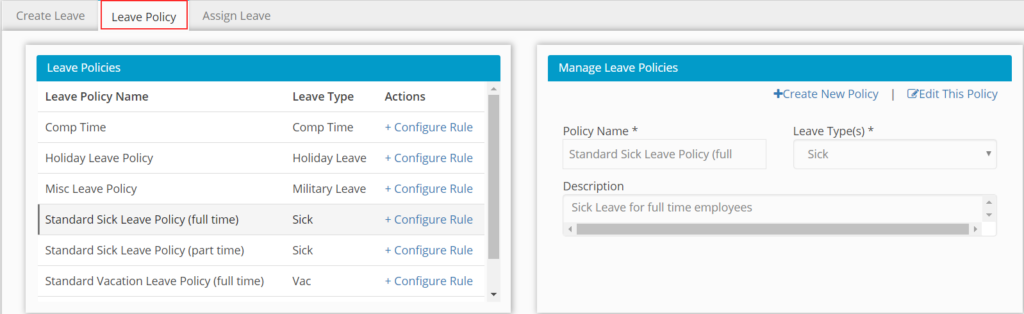
- Click the Leave Policy tab
- Click Create New Leave Policy.
- Enter Policy Name. (Sample: Standard FT Sick Leave Policy)
- Select Pay Type from the Select Leave Type drop down box. (Sample: Sick Leave)
- Enter Leave Description. (Sample: Standard Sick Leave Policy for Full Time Employees)
- Click the Save button to complete.
- Repeat steps 1-8 above for each leave type.
Configuring Leave Policy Rules
- Click the Leave Policy tab
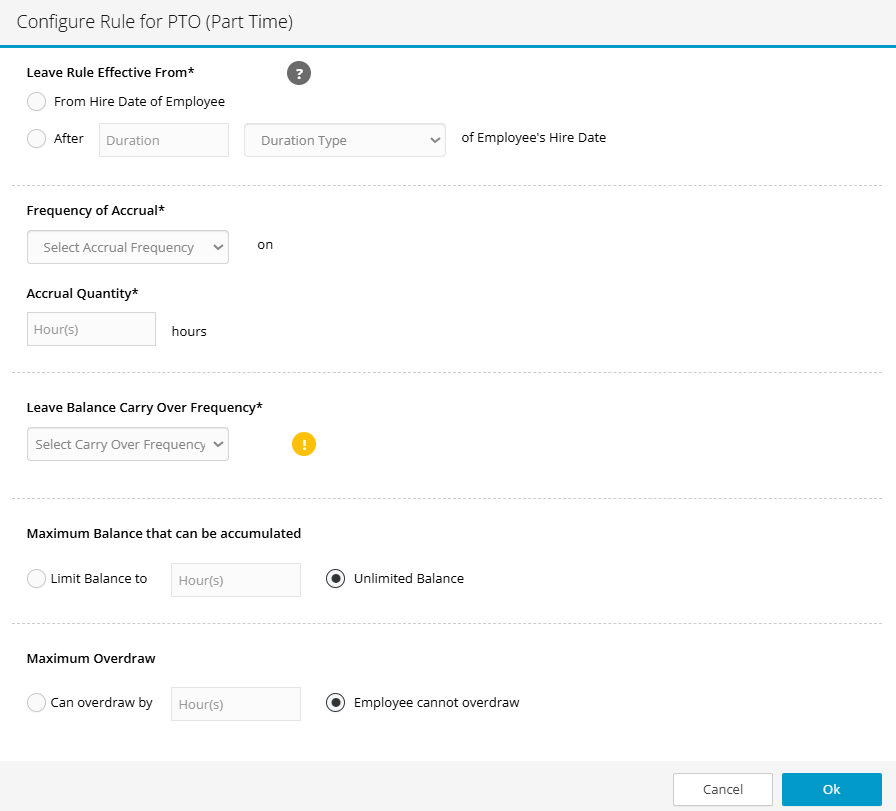
- Click the +Configure Rule text next to the leave to be configured. Complete the following:
- Leave Rule Effective From – Click the radio button for one of the two options below for this setting.
- From Hire Date of Employee – Runs the accrual from each employee’s hire date.
- After [user defined] Duration from employees hire date – Accrual for each employee will not begin until duration time is complete.
- Frequency of Accrual – this field is to define the period of time in which an accrual will run. Examples (weekly, bi-weekly, semi-monthly, monthly, annually)
- Accrual Quantity – this field is used to define the rate at which the leave will be earned for each of the frequencies identified above.
- Leave Balance Carry Over Frequency – if leave balance carries over from one period to another, the user will be able to define the date on which the carryover occurs.
- Max Balance – this feature allows the user to set the maximum number of hours for each type of leave that an employee may carry on the books. Once this value is reached for each employee, the remaining hours will be accounted for as Lost hours.
- Max Overdraw – this feature allows the user to define the number of hours that an employee may go “into the negative” for each type of leave.
- Click Ok
- Repeat steps above for each leave policy.
Notes:
Balance is reduced after timesheet is submitted at the end of each timesheet period.
User may be allowed to “go into the negative” if feature is configured.
System will stop accruing leave once limit “ceiling” is reached. Additional leave earned or accrued after leave ceiling is reached is moved to the “lost” column.
Step 9. Assign Leave Type to Employee(s)
Now that your Leave Types and Leave Policies are in place, the final setup step is assigning them to your employees. This is what connects the leave rules you’ve configured to the actual people on your team. Until leave is assigned, employees will not see leave options on their timesheets and will not begin accruing time off. Assignments can be tailored by job role, eligibility, or individual employment agreements.
Employees must have leave types assigned before they can use them on their timesheets.
Assigning Leave Type to Employee
Creating Leave associations by employee is required so that the timesheet can select “Add Leave Hours” from the employee timesheet. To assign Leave Types to an Employee:
- Login to Hour Timesheet as Admin or Accountant
- Navigate to Accounting→ Leave sub menu
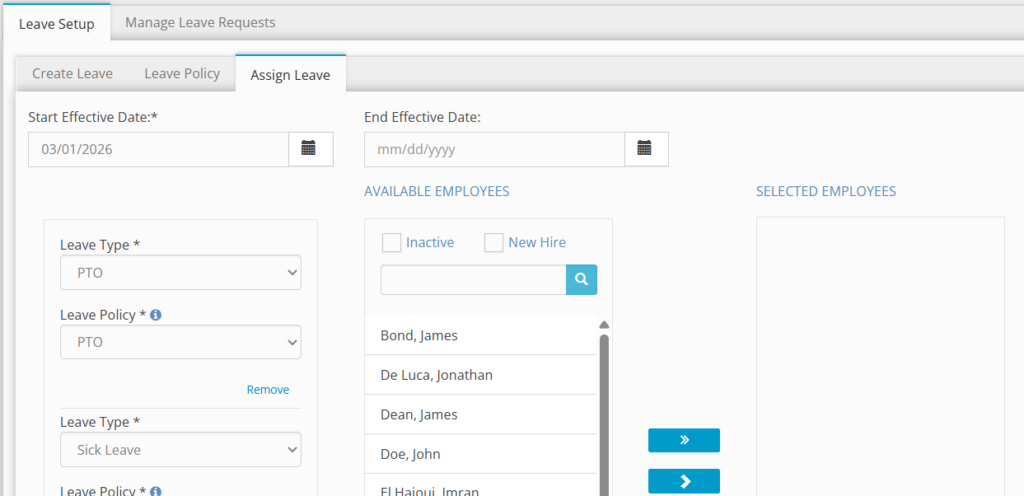
- Select Assign Leave tab.
- Click the calendar icon box to select a Start Effective Date and End Effective Date (optional)
- Select a Leave Type from Available Leaves selection box.
- Select a Leave Policy from Select Leave Policy selection box.
- Select from the Available Employees from Available Employees selection box.
- Click the > to move the Employee(s) to the Selected Employees list box.
- Click the Assign button to complete.
- Repeat steps 1-9 above for each leave type.
Add or Edit Starting Leave Balances
Once leave has been assigned to employees, there may be times when you need to manually adjust a leave balance. This is common when onboarding new employees who are bringing over an existing balance from a previous system, correcting an entry error, or making a one-time exception approved by management. Hour Timesheet gives authorized users the ability to view and edit individual employee leave balances directly from the Employee Detail screen.
You must manually enter existing leave balances (from previous systems) before the go-live date.
To Add/Adjust Leave Balances:
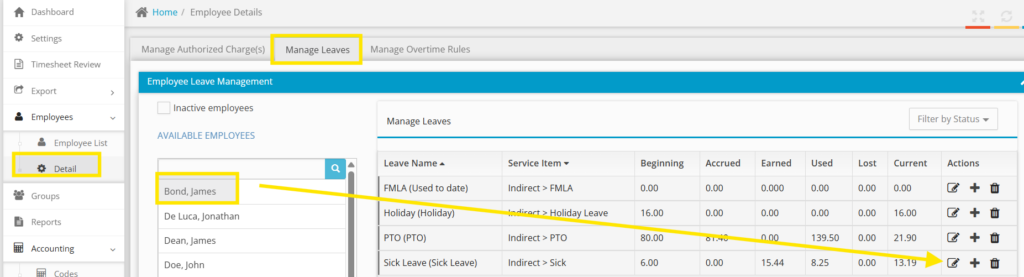
- Navigate to Employee > Detail menu.
- Select the employee.
- Click the Manage Leaves tab.
- Locate the leave type and click the edit icon.
- Adjust the balance values (Beginning Balance, Accrued, Earned, Used, Lost, Current).
- Click OK.
Step 10. Create and Assign Overtime Rules
Understanding Overtime Rules
The Hour Timesheet Overtime Rules page allows the system admin to establish a business rule to set a threshold on the timesheet so that employees are forced to charge time to an “overtime” pay type once certain criteria is met (defined by the rule). Once configured; the employees will be notified upon timesheet entry that hours must be moved to a pay type associated with overtime. These hours will be identified in RED on the timesheet to the employee.
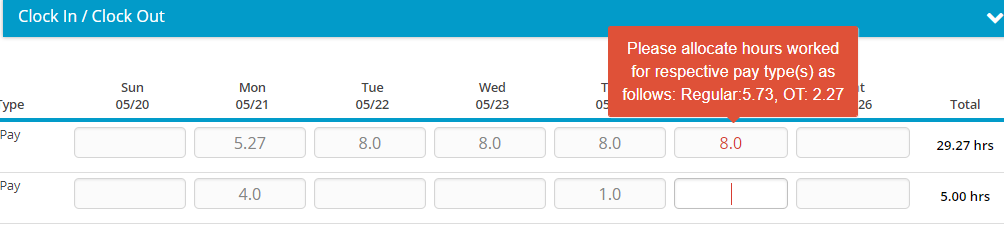
Overtime rules automatically alert employees when they exceed daily or weekly hour thresholds, requiring them to reassign excess hours to an overtime pay type. Once configured; the employees will be notified upon timesheet entry that hours must be moved to a pay type associated with overtime.
These hours will be identified in RED on the timesheet to the employee
- Login to Hour Timesheet as Admin or Accountant
- Navigate to Settings/Overtime Rules tab
- Click Create New Overtime Rule
- Enter Rule Name (description of rule)
- Identify Pay Type(s) included in OT – these pay types should be the pay types associated with core hours (Regular, Hourly, etc.). This setting allows for multiple pay types to be identified.
- Check box with Rule Option. This setting allows the user to select a “Daily” or “Weekly” overtime Click Ok.
- Identify Pay Types from drop down box that contain the overtime pay type that must be used once a user has exceeded the daily and/or weekly overtime rule.
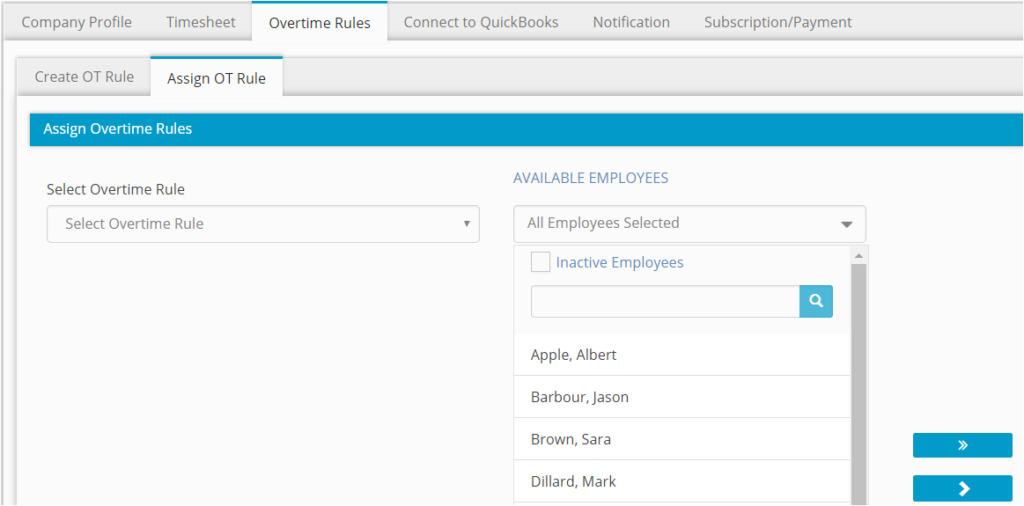
Assigning OT Rules
- Select the rule from the drop-down box
- Move the Employees from the Available box to the Selected box – these can be selected one at a time or be filtered by group.
- Click Assign
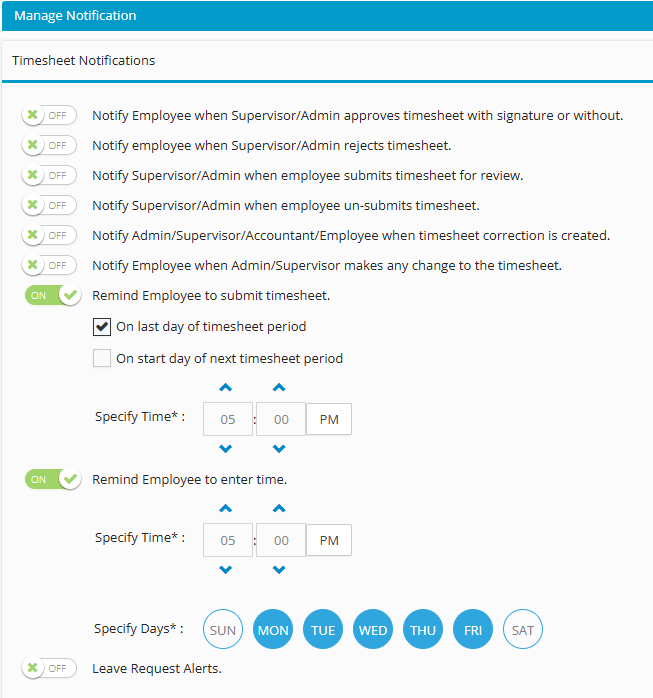
Step 11. Setting Reminders and Email Notifications
The following notifications are available in Hour Timesheet. By default, they are toggled to the off position for all new accounts.
- Login to Hour Timesheet as Admin or Accountant
- Navigate to Settings/Notifications tab
- Toggle rule(s) to On
- Click Update to save changes
Step 12. Sending Employee Invites
Hour Timesheet will import your company’s employee list during the initial data import process. If syncing with QuickBooks, the email address must be populated from within your QuickBooks company file then synced to Hour Timesheet. Employees will use an email address as a login to Hour Timesheet. Each employee will be emailed a signup invitation link and will be able to complete the self-sign-up process by following the steps below:
- Login to Hour Timesheet as Admin
- Navigate to the Employee menu
- Enter employee email address (if missing)
- Click More
- Click Send Invite.
- At this time, the employee will receive an email invitation containing a Sign-Up link
Timesheet Status Options
There are 3 different status’s file employee self-sign-up email invitations from Hour Timesheet
Pending Invite – the employee has not been sent an email invitation to sign up for Hour Timesheet. An email address must be in the email address field to trigger the Send Invite process.
Invitation Sent – the email invitation has been initiated from Hour Timesheet. The status will remain unchanged until the employee completes the sign-up process.
Signed Up – the employee has received the email and clicked the Sign-Up button to initiate the signup process. The link in the email will expire within 72 hours. If necessary, the Admin can resend the sign-up invitation to the employee.
Updating Email Addresses
Updating Email Addresses The primary data source for email addresses is your company QuickBooks file, to update an email address, the record must be updated in QuickBooks then synced into your Hour Timesheet account.
Forgot Password
If a user can’t sign in because they’ve forgotten their password, they can reset it directly from the Hour Timesheet sign‑in page. This process is fully self‑service and does not require administrator involvement. On the Sign In page, users will see a link labeled Forgot Password? directly below the password field. Selecting this link begins the password reset process.